All Posts (303)

Sort by

ArmQuad Y6


First flight of mini coax Tricopter.
These test are aimed at obtaining a reliable platform that can replace a helicopter r / c for shooting video and photos, especially the ability
to 'payload.
Thedesign will always recognizable at Y pilot orientation of the aircraft
at altitudes also important in addition to allowing shooting from
various angles without framing arms.

The motors arranged coaxially ensure redundancy in case of failure of one engine and / or regulator exc.

Greetings everyone,

Danilo


Primo volo del mini tricottero coassiale.
Queste sperimentanzioni sono finalizzate ad ottenere una piattaforma affidabile in grado di sostituire un elicottero r/c per le riprese video / foto, in particolare per la capacita' di payload.
Il disegno a Y renderà sempre riconoscibile al pilota l'orientamento del velivolo anche ad altezze importanti oltre a consentire riprese da varie angolazioni senza inquadrare i bracci.

I motori disposti coassialmente garantiscono ridondanza in caso di guasto ad un motore e/o regolatore esc.

Saluti a tutti,

Danilo

Read more…

Dear Friends,

this is the video of first flight of Multipilot32 that use  ArdupiratesNg32 rev. 2.01 firmware.

I ported to Multipilot the 8bit firmware , change all the library necessary to firmware and doing some small patch on original firmware.

At the moment i fly in stable mode + configuration with this PID (3.00 , 0.150 , 0.900)

As sensor i use Oilpan , in the firmware i don't yet activate GPS , BARO and Magnetometer , i doing some test but before to fly i need to optimize the i2c code and deactivate the debug functionality that degrade the speed of execution of code.


This is the official thread of pre flight check of ArdupiratesNG32 v 2.01

http://www.virtualrobotix.com/forum/topics/armfoxv4-ng-32-and

In the next day I update this section of discussion with some new tips and tricks

Best

Roberto

Read more…

Quadcopter . . . On The Moon!

1110-77-Dx582.jpg


Known as the Terrestrial Artificial Lunar and Reduced Gravity Simulator, or Talaris, the three-foot-wide vehicle is a smaller version of a hopper that would be used in space. It is designed to go about 20 meters per hop; space-based hoppers might cover tens of kilometers--or possibly more--in a single bound. The team that built Talaris wants to use it on Earth to test guidance, navigation, and control software developed by Draper that would allow the space-based hopper to navigate autonomously.


The prototype was developed as part of MIT's effort to win the Google Lunar X Prize, a $30 million competition to get a privately funded spacecraft to reach the moon, travel 500 meters across its surface, and transmit video, images, and other data back to Earth. Both MIT and Draper are members of Next Giant Leap, one of about 20 teams registered in the competition.


Original post : http://www.diydrones.com/profiles/blogs/quadcopter-on-the-moon


Leaps and Bounds - Technology Review


Read more…

70875151?profile=RESIZE_1024x1024

In the last two years i fly my electronics with different kind of frame :

This was my first frame Fox One:


My second frame wasFox TWO :


Then with my Friends Franco develope FOX III This is our Pro Carbon Fiber Frame :


Then with AleBS i develop low cost frame :


And this Summer with Antonio I work at VR Dragon ...

Now is the time of new frame generation ... With the help of Roberto74 that doing a great job We working on new frame produced using 3D printer technology. We waiting the first prototype in the next week stay tuned :)

So we have better Electronic and better approach for design our future frame directly from our mind ... :)


70875151?profile=RESIZE_1024x1024

70875215?profile=RESIZE_1024x1024

Check our store on shapeways ... after we doing some check on prototype will be available here :

http://www.shapeways.com/shops/virtualrobotix


Original blog post here : http://www.virtualrobotix.com/profiles/blogs/first-concept-frame-proposal-for-mp32f4-from-idea-to-ready-to-fly


Read more…

ARDUROV PROJECT - REMOTE OPERATED VEHICLE

ARDUROV T100
- PRELIMINARY PROJECT ANALISYS -


Overview


ArduRov is an under water electrical vehicle controlled by the surface trough an umbilical cable, operator drive the Rov by the image of a camera and with the help of various sensors.
The goal of the project is the realization of a cheap ROV, a rock solid open source software, a modular design for a safe and easy use
The project could be divided in different parts, to be discussed and developed.


Surface Electronics


A small box with the power supply , Surface telemetry electronics and the video output
Options:
BASIC: A Simple Plastic Box with Input/Output connectors, PC or R/C Joystick
Advanced: A Case with LCD Monitor ,Telemetry Overlay or second LCD, A PlayStation JoyPad
PRO: A Consolle with HD Monitor, Overlay, DigitalRecording, Custom JoyStick etc


Umbilical Cable


To maintain a low cost the umbilical cable will be a standard multipolar PVC cable with at least 8 conductors, section of the conductor is to be defined depending to the final amps consumption.
My Idea is start with 50 mt of umbilical cable to avoid the needed of a winch to handle the cable.
All parts of the ArduRov Basic must be projected for a pressure of 20 bars (-200 mt)
Options:
BASIC: 30 mt of PVC 8 Conductor Industrial cable
Advanced: 100 mt of Kevlar armoured cable with hand winch
PRO: 200 mt of Kevlar armoured cable with motorized winch


ROV Frame


The frame must be as modular as possible, corrosion free, and with a low water drag.
For my experience the best way is use two polypropylene mono-block shoulder connected by Anticorodal Anodized “U” profiles. Carbon Fiber will be the next spet to reduce weight in air.
The profiles will be used to fix the thrusters, the underwater electronic pod, camera, lights etc
Options:
BASIC: polypropylene / Anticorodal frame
Advanced: Carbon Fiber/ Anticorodal frame
PRO: Full Carbon Fiber Frame with hydrodynamics surfaces
Buoyant System
To Compensate the weight of the ROV a buoyant system is needed, there are different method to add buoyancy but the most reliable will be the use of block of a special close-cell polymer.
A cheap solution could be polystyrene but it will fault at more than 5 bars (-50mt)


Options:
BASIC: polystyrene
Advanced: close-cell polymer
PRO: close-cell polymer with Carbon Fiber Coating

Thrusters


Propulsion is one of the most important thing in an ROV, We plan to use 3 , 5 or 6 thrusters to control the vehicle. Basically One or two thrusters are vertical and controls only the depth and eventually the tilt of the ROV and two or four thrusters are disposed on the same plane as in the following scheme:


This configuration allow Reverse , Forward , Left, Right and Rotation movements, to archive more thrust rear propulsion could be oriented differently.
The main problem of the thruster is the design of the underwater housing to resist at the pressure and at the same time not reduce the mechanical power, there are several different techniques to do this:
- Direct Shaft output with O-rings (cheap but with poor performance and frequently maintenance)
- Ceramic Shaft Seal with Oil Compensation ( Expensive and need special tools to fill oil )
- Magnetic Coupling with Dry Motor and magnetic Follower ( A bit more complicated design and project costs but virtually no maintenance and good efficiency )

Motor type should be Brushless sensorless, this type of motor can be controlled by an Electronic Driver and perform a good torque and a good power/dimensions balance.
We need to find a good motor with a very low Kv to have the maximum torque and reduce the RPM.
A good rpm speed could be around 2500 Rpm at full thrust.

Options:
BASIC: cheap R/C Brushless motor with direct shaft output with O-ring
Advanced: Industrial Brushless motor with hall effect position sensors and magnetic traction system
PRO: Custom Brushless Motor with hall effect position sensors and magnetic traction system


E-POD


Basically the epod in the brain of the ROV, is an Anticorodal cylinder with connection on both sides.
One side receive the umbilical cable and the other side have all output (Thrusters , camera ,lights etc).
In the e-pod there is the electronic board and the Power conversion board to power-up the brushless motors and to convert Voltage to an appropriate value for all the equipment installed.
One part of the e-pod side will be reserved for sensors (Depth sensor, compass, temp sensor etc )


Options:
BASIC: Anticorodal cylinder with cast resin cable connections without sensors
Advanced: Anticorodal cylinder with underwater connectors + depth sensor and compass
PRO: Anticorodal vaacum cylinder with underwater connectors + depth sensor , compass , temp sensor , altimeter , and Lipo Power pack optional connector for UAV conversion.


Camera


Camera is the underwater “eye” of the pilot, could be standard 640x480 resolution or HD depending on the scope of the ROV. It is composed by an Anticorodal or Derlin Cylinder with a correction lens at one side and a connection cap at the other side. For standard resolution we will use a video-baloon converter/amplifier and a twisted pair to send video to surface.
Camera could be static or remote tilted to allow a panoramic view


Options:
BASIC: Standard 640x480 b/w camera with fixed focus and fixed iris
Advanced: Standard 640x480 color camera with fixed focus and fixed iris with remote tilt possibility
PRO: HD Camera with remote zoom , focus , Iris with pan and tilt possibility


Light


Lighting is very important underwater, especially in sweet water where you will be in the dark at few meters deep. A natural light is required for a good view and we can use halogen or led source for our purpose.


Options:
BASIC: 2 x halogen light with on/off control
Advanced: 2 x halogen light with dimmer control
PRO: 3 x halogen light with dimmer control

________________________

This is a very preliminary and personal analysis, feel free to comment, add, contest everything... and sorry in advanced for errors.

Taborelli Flavio

Read more…
Nicolas Burrus has created uploaded this video where he is experimenting with 3D reconstruction of the scene with freehand Kinect device. When he moves around the Kinect, more and more of the surroundings is captured and reconstructed in 3D. So this means that if we sufficiently move around Kinect in a room, we can get a full 3D reconstruction of the room with all its objects; doing this kind of thing till now would have cost thousands of dollars but now with Kinect its very simple and yet very effective… Original Post from : http://kinecthacks.net/experimental-3d-scene-reconstruction-with-kinect/
Read more…

Dear Friends,

today i upload last revision of ArducopterNG32 , I upload the code after my fly test doing tomorrow.

This is the video.

With this revision of code is possible to fly in acro e stable mode.

Today i'm doing my first outdoor test of ArmFox V4 firmware in basic configuration , I'm happy of the result , the quad is flying fine and  seems reliable, even if a revision is alpha code.

In this test i use standard component , don't professional part.

MP32 and Oilpan work fine togheter.

I use 4 Chineese standard 18 A PWM ESC buy on Giancod store at 6$

Standard Motor 900 kv

10 inch propeller.

Standard 6 channel analog reciver on 35 Mhz.

So this is an entry level configuration. 

Yesterday I spoke with Diego L. that are using only analog gyro and accelerometer connected directly to MP32 , That sensor normally is used on Aeroquad , but is the same that mount Oilpan , the only difference is that is connected by spi adc to MP32 instead on Diego configuration It is directly connected to analog input.

The MP32 analog input is better of avr analog because are at 12 bit . We notice that the configuration of analog is the same of oilpan. The resolution is the same.

The   video , is only a raw fly with some test for check relability.

I need to setup the PID on gyro , today during flying there was much raffic of wind .


This is the link to the code. http://code.google.com/p/multipilot32/downloads/detail?name=ArmFox_V4_NG%2809-04-11%29-alpa2.rar&can=2&q=#makechanges


This is the tutorial for pre flight check : http://www.virtualrobotix.com/forum/topics/armfoxv4-ng-32-and

You can use all your standard Diydrones accessories with MP32 for assemble your drone.

MultipilotP32  ( http://www.virtualrobotix.com/page/multipilot32-1 )   is available in the stock if you need more information send a mail to

virtualrobotix@gmail.com


MP32 is next revision of CPU for Arducopter project based on 32 Bit arm microprocessor with 72 mhz of clock and a lot of innovative hardware feature as 2 i2c one for sensor , can bus , 512 kbyte flash and 64 kbyte ram.  12 bit analog input for more info visit discussion forum on  www.virtualrobotix.com

Next step is testing advanced functionality on air : Gps hold ,altitude hold ecc


Some suggestions about my PID these is the standard available on Arducopter NG

P 4.0

I 0.150

D 1.20


I change also Stick_to_angle factor conversion for have more command available.

What do you think about ? In the next test i would put our VR ESC that use i2c bus and have 256 step of resolution this esc only 127 :( That's could be a problem for good fly ... :)

Best

Roberto


Read more…

From Xconomy: "A couple of startup companies set a world aviation record last night.

But they were pretty low-key about it. As I walked into the Future of Flight Aviation Center in Mukilteo, WA, a half hour north of Seattle, I saw little activity. It was after hours, and the hangar-like building was nearly deserted except for the futuristic planes suspended from the ceiling—Burt Rutan’s “Quickie” and a Beechcraft Starship—and part of a Boeing 787 Dreamliner fuselage on the display floor. It was a bit like “Star Wars” meets “Night at the Museum.”

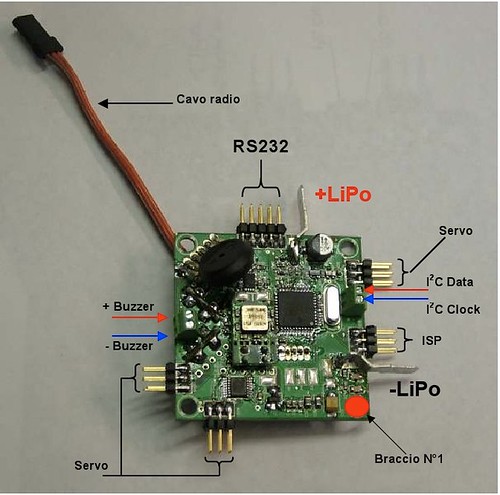
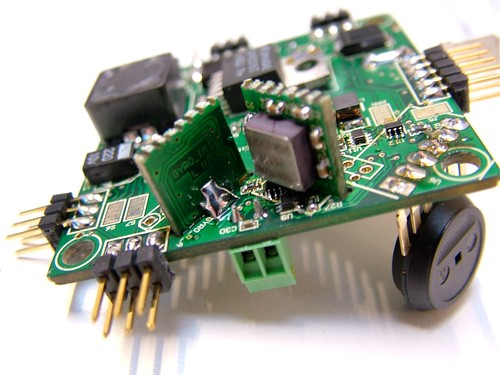
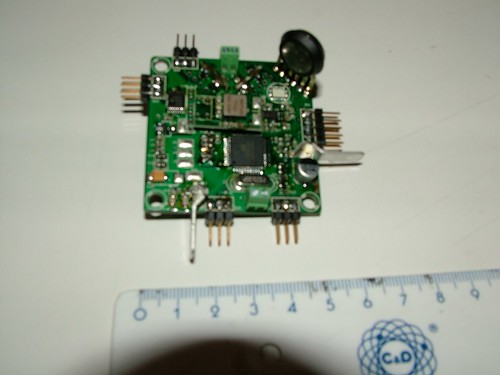
Tom Nugent, the co-founder and president of Kent, WA-based LaserMotive, greeted me and said they were almost ready for showtime. A small team of engineers divided its attention between the back of a command truck and the adjacent trailer that held the laser optics equipment that would make the show possible. Two German guys who hadn’t slept in days (and were still on Munich time) were sprawled out on deck chairs in front of computer monitors like they were playing a video game. One held a remote controller that he used to guide a “quadrocopter”—a small, 1-kilogram, square-shaped flying contraption with blinking lights and four spinning rotors—made by their company, Ascending Technologies.

Jan Stumpf and Michael Achtelik, the co-CEOs of Ascending Technologies, partnered with LaserMotive to perform this feat last night. The goal: to use a laser to power an aircraft in continuous flight for about 12 hours (far longer than its battery would last without recharging, which is only about five minutes). That would be a world record, by a long shot, for the longest free flight of an electric vehicle.

Indeed, this demonstration is a big deal for the future of electric planes, said Barry Smith, the executive director of the Future of Flight facility. Imagine putting a laser on top of every cellular tower, he said, so that certain types of unmanned aerial vehicles (UAVs) would never need to land to recharge or refuel. That could potentially revolutionize communications, surveillance, and security and defense applications. Longer term, it could even impact the long-held dream of powering manned aircraft with electricity instead of jet fuel—though that is very far off.

For now, Nugent says, “The significance is we’re going to show this quadrocopter, and any aerial vehicle [of this size], will be able to fly effectively forever. It’s no longer limited by battery capacity.”

LaserMotive has done smaller flight tests before, but not on a free-flying vehicle like this. The company is best known for winning the $900,000 NASA Power Beaming Challenge last year, in one of the levels of the “Space Elevator Games.” That involved using a laser to power a climbing robot up a cable to a certain height (1 kilometer) at a certain speed (about 9 mph). But lately the company has been targeting UAVs as a big commercial application of its wireless power technology. (The next level of the NASA challenge, which was supposed to happen later this year, is still up in the air, so to speak.)

“Goggles on!” someone shouted, and we all complied. That meant the infrared laser, which puts out about 200 watts of light power, was switching on. The beam was directed using a series of mirrors and optics and shot out the top of the trailer. You couldn’t see it with the naked eye except for a reddish halo on the 50-foot ceiling. At the same time, the quadrocopter lifted off (under its own battery power), guided by Stumpf, and floated up to meet the beam, about 30 feet off the ground (see left).

“Not centered,” Nugent said. Then the computer vision system of LaserMotive’s setup kicked in. Software and cameras aligned with the path of the laser beam tracked the vehicle’s position, and positioned the beam so it hit the photovoltaic cells on the underside of the craft; those solar cells transformed the laser’s energy into electricity to continuously charge the quadrocopter’s battery.

With that, all human corrections fell away, and it was just a drone hovering eerily in space, rotors humming quietly. It swayed a few feet from side to side, and the laser tracked it. It was about 7:40 pm.

This is the boring part, Nugent said. And boring is good. Exciting is bad. For the next 12 hours, if all went well, nothing more would happen. The craft would stay up all night (as would the crew),and sometime after 7:30 am, it would come in for a choreographed landing in front of 50-odd media and dignitaries. But anything could happen overnight—mirrors in the optical system could overheat and malfunction, or something in the craft or its solar cells could break, or software could crash. There’s no way to know except to do it.

In the meantime, Nugent filled me in on the business prospects of LaserMotive, which he co-founded in 2007. The company is out fundraising—talking with angel investors, angel groups, and venture capitalists—as well as trying to land more contracts with corporate and government partners. One new market has emerged: beaming power to cellular communication towers in places where running a new power line or otherwise upgrading power equipment is too expensive. As for UAVs, Nugent said, the plan is to show potential customers (presumably UAV companies and government labs) that the power-beaming approach works in flight—perhaps at distances up to a kilometer or two. The first applications might be in disaster relief or military scouting operations.

I also took the opportunity to ask Jordin Kare, the co-founder of LaserMotive and a laser expert who worked on the “Star Wars” missile defense system in the 1980s, about the broader significance of what he was watching. “This is the first combination of power and control and duration,” Kare said. “What it really marks is being able to take an off-the-shelf vehicle and power it with a laser so it can do a lot more…The prospect of being able to keep airplanes and communication systems up in the sky forever is an amazing thing.”

On the practical side, Kare said an important factor in all this is how efficient laser systems have become. Although the current demo only converts about 10 percent of the power needed to drive the laser into flying the quadrocopter, it could be more like 20 percent once the team optimizes the technology. And beyond that, Kare thinks there might be some new way, some approach he hasn’t thought of yet, to make the craft’s solar cells better at squeezing more electricity out of the beam.

Until then, this world aviation record will have to do. This morning, in a quintessentially rainy Northwest setting, the quadrocopter came in for its landing a little after 8 am to a chorus of applause. Now maybe these guys can get some sleep—and get ready for the next big challenge in power beaming, whatever that might be."


Read more…

12232294679?profile=original


Official Video by Mediaset : http://www.striscialanotizia.mediaset.it/video/videoextra.shtml?12757
This video was produced by Italian Television . Some people inform the autorithy about the presence of ufo in the sky of Naples in Italy ... , But a Napoletan member of FOXTEAM http://www.virtualrobotix.com see the trasmission and identify in that ufo his quad .. that use Multipilot .. ;) So he called The Gabibbo and explain that The UFO isn't extra terrastrial , but An Italian QUAD .. ;)

Best Roberto.

P.S.

Great Job Pippo  ... another X Files is Closed :)


Read more…


The most natural way to interact with a robot is through gestures and voice commands which is the purpose of this hack. Bener Suay is controlling Nao (the incredibly cute) humanoid robot using Kinect. He gives gesture commands and also makes the robot mimic some of his movements. He also says that another purpose of this hack is to make teaching new tasks to robots easier, even for people with no robotics knowledge and the ultimate aim is to make contribution to Learning from Demonstration field.


You can download the source code here https://github.com/wpi-ros-pkg-git/nao_openni


Original pot from : http://kinecthacks.net/controlling-the-humanoid-robot-nao-using-kinect/


Read more…

125 milligram optical flow sensor "TinyTam"


As an exercise in size reduction, we have prototyped a complete optical flow sensor in a 125 milligram and 7mm x 7mm package. This mass includes optics, image sensing, and all processing. Below is a video and two close-up photographs. In the video, note the green vector indicating measured optical flow as a result of image motion.

Image sensor: Centeye Tamalpais 16x16 pixel image sensor (only an 8x8 block is being used), 1.3mm x 4.1mm, focal plane about 0.3mm x 0.3mm.

Optics: Proprietary printed pinhole, about 25 microns wide

Processor: Atmel ATtiny84

Optical flow algorithm: Modified "Image Interplation" algorithm, originally developed by Prof. Mandyam Srinivasan (well known for his research on honey bee vision and navigation).

Frame rate: About 20Hz.

This work is being performed as part of Centeye's participation in the Harvard University Robobees project, an NSF-funded project to build a robotic bee. The final target mass for the complete vision system (including processing) will be on the order of between 10mg to 25mg, and will include omnidirectional sensing as well as algorithms to detect flowers. Obviously we still have some more work to do!

We documented the construction of this sensor, with lots of photographs, in case anyone is interested.


Original post: http://www.diydrones.com/profiles/blogs/125-milligram-optical-flow
Read more…

Dear Friends,

in these day i continue to investigate the better way to develop good video with Hexafox32 platform.

I add the managment of gimbal on code and doing a video , then i put the result in stabilization software in this video on the left is possible to see the hardware stabilization (some times you see the front tail move on video ) and on the right the software optimization doing in post processing.

What do you think about my results , this video is doing with GoProHD , but i doing also other video with a compact camcoder Panasonic SD90. I'm also working on VR Dragon with MP32 on board with professional gimbal stabilization for manage Canon EOS 7D or my 600D

Best

Roberto

Read more…

With the new fast prototyping tecnology is possible  to develop new technology from the concept to reality . With high performance DIY electronics and 3D Design tools today is possible to obtain this kind of result.

This is our experience :

We use some 3D Pro as EdgeWorks or Solidworks and Opensource Tools as Bleender for design the frame.

70875151?profile=RESIZE_1024x1024

70875215?profile=RESIZE_1024x1024After design we send our advanced project to a fast prototyping company as Shapeways

http://www.shapeways.com/shops/virtualrobotix

Then After some weeks is possible to recive the Frame .

After I put all the electronic inside the new frame I'm ready to doing the first flight the result of first experience was great , in only two hours we put all electronic inside the frame  in the next days i would doing also some outdoor flight and put in front of quad a Gopro HD 2 cam for FPV :

The next step will be review of the original project with some upgrade as :

less material for have less price and less weight.

At the moment the weight is around 360 gr is yet good.

In order  to fly with:

  • Multipilot32+NAVI FULL the frame is compatibile also with APM+OILPAN
  • 4 Keda 20-22 Motors.
  • 4 Hobbywing 30 A
  • 4 10 '' propeller.
  • a 3S 4500 ma lipo

around 1250 gr

The main upgrade in our mind is more space for 10 '' propeller originally was developed only for 8 '' prop

possibility to change the tail if one broke. Better design for open and close cover on top of quad.

If you have other suggestions are welcome.

Read more…

LN MultiBoard ready for store.


12232294085?profile=original


12232294664?profile=original


Hello everyone,

these are the first images of the cards will be available in stores are preparing.Multi Board cards were created to make aircraft and vehicles based on automatic technology Arduino.The basic software currently supported are:

  • Aeroquad
  • Arduimu.
  • Arducopter.

The LN MultiBoard 1.0 board details :

  • AVR 644P (Sanguino compatible micro)
  • 1 Power Switching da 8-30 Volt 3 Amp.
  • 3 mems gyroscope 220 °/s
  • 1 Accelerometer a 3 Axis X Y Z 2 G.
  • 2 Pressure sensor 20 cm of resolution.
  • 4 PPM Output Servo PPM 5 Volt using 4017 TTL LOGIC.
  • 2 PPM Ouptup using standard ServoTime2 / ServoTimer PWM Library.
  • 1 I2C Bus for motor control( LN BL Controller 20 Amp.)
  • 1 Serial BUS TTL
  • 1 SPI BUS TTL
  • 1 Speaker Output.
  • 2 Digital Output genarl pourpose.
  • 1 PPM Input for R/C Controller.

Details

visit the site of company that develop LN Multipilot 1.0 http://www.lasernavigation.it visit https://www.youtube.com/rnavoni to see LN Multipilot 1.0 in action. visit http://code.google.com/p/aeroquad/
I'm starting to support the project the goal is to port Aeroquad
firmware on MultiPilot


4272797408_7c90eac2a5.jpg

4269622160_0f8d4cb395.jpg

4269605504_14b18928bd.jpg

Read more…


70862452?profile=RESIZE_1024x1024

It's generally considered a bad idea to pre-announce products, but hey, we're an open source community. It's not pre-announcement--it's transparency!


We're working on about a dozen new products at the DIY Drones factory. Some of them are with partners, so I'm not free to discuss them until the partners give us the green light. But others I can tell you a little bit about now, so you'll have a roadmap to help you make your own technology and deployment plans.


First, one note about backwards compatibility: we're committed to it. This is a fast-moving field, and we're going to release products based on the latest sensors and chips as fast as we can, because this community expects that. Think of autopilots like cellphones: you're probably going to want to upgrade about once a year. But we also work hard to ensure that the hardware you buy today will continue to be supported for at least two years.


Also, new products will be released in beta, as always. Unless you're really keen to help us catch bugs and fix problems, you're not going to want to buy any of these products until they hit the 1.0 software release, which can be as much as six months after hardware release. If all you want is a great-flying UAV, you can't beat the current APM. Most of the following products probably won't hit that level of maturity until late 2011.


Here are some of the highlights:


MultiPilot 2 ST (32-bit ArduPilot!)

This is a 32-bit Cortex M3 (ARM 7) autopilot board (board layout shown above) that's compatible with ArduPilotMega, ArduCopter and the Arduino programming system. Developed by Roberto Navoni of VirtualRobotix and the Foxteam in Italy, working with DIY Drones and the Arduino team, this board uses the APM IMU shield and will run the ArduPilot family of code, just like APM.


You can read more about it here, but the basics are that this board will offer high-end processing power for pro-level autopilot needs in planes, multicopters and helicopters. It can run a Real-Time Operating System and will be ROS-compatible.


Current specs are as follows, although these will be upgraded to the latest chips available at the time of release


  • Arm7 Cortex M3 processor STM32F103VET6. 72 Mhz
  • Flash 512 Kbytes RAM 64 Kbytes
  • 16-bit Timer 4
  • SPI 2 (ADC Interface, MicroSD connection)
  • I ² C 2 (First I2C (sensor), Second I2C control until ESC 12)
  • USART 5 (GPS, DEBUG Console, XBee Pro Telemetry)
  • USB 1 (Upload Firmware, Debug Console, Power Board for Debug)
  • CAN 1 (Interconnection with Professional ESC 1 Mbit update rate)
  • 6 PWM Output Bit 16 (ESC / Servo Control)
  • 8 PWM Input 16 Bit (RC Input Channel, accept PPM SUM)
  • 8 Analog Input 12 Bit.
  • Professional 4 layers PCB.
  • DC: DC 30 V (6s Lipo): 5 volts and 3.3 volts


First prototype boards are incoming and you should not expect commercial versions to be available with release code until the second half of the year. Pricing is yet to be determined. Projected Release: Q3


ArduPilotMega 2560


Starting in about two weeks, all APM boards will ship with the Atmega2560 chip, which has twice the memory of the Atmega1280 chip that APM currently uses. There are some other minor changes to the board that have already been released in the 1.4 version that is currently shipping. The current code doesn't need all this memory, so the new boards will operate exactly like the current ones and there is no need to upgrade. But this does give us room for more ambitious enhancement to the code in the future. Projected Release: end Jan


New All-In-One ArduPilot boards


Not everyone wants a flexible development board like APM. Some people want smaller, simpler, cheaper autopilots. That's why we'll be releasing all-in-one versions of APM this year using the new Invensense MPU-6000 6-axis chip (we may be the first autopilot on the market to have them). As promised, we will also update the current APM IMU shield with new sensors when we get them (this is why we made APM modular--so you can upgrade components as technology evolves). Projected Release: Q2


Universal Ground Station


As Jordi hinted in this post, we're developing a universal ground station: a wireless hardware device that can render an in-browser Ground Control Station on any smartphone, tablet or PC. This "magic box" will be a wireless router between your aircraft and the display device of your choice, as well as driving a tracking antenna and providing datalogging. It's the ultimate cross-platform GCS! Just imagine controlling your UAV via an iPad or even an Andoid phone. This device will make it easy--no software required. Projected Release: Q2


More Pre-Made autopilots and UAVs


At the DIY Drones store, we only sell components and kits. But our partners around the world are gearing up to sell pre-made autopilots and even ready-to-fly UAVs. You can already buy an ArduCopter with pre-soldered APM electronics from FahPah, but you'll see more in that vein from FahPah and others early this year. The marketplace has spoken clearly on this--not everyone wants to have to use a soldering iron or load code to use a UAV--and DIY Drones partners are responding. Projected Release: Q1


On the code side, expect the versions we release this year to increasingly do auto-detection of hardware and otherwise require less setup. Our ambition for 2011: make UAVs as close to plug-and-play as possible. You can hack APM all you want, but if you don't want to see a line of code you don't have to.


Other cool stuff


The above is just a taste of what we've got in the pipeline. Other products that are in the prototyping stage including open source On-Screen-Display boards (including integrated with APM), open source ESC, smartphone interfaces, new GPS modules, ground rover autopilots and more!

Read more…

Dear Friends,

this is the OnBoard Video during the flight test of HexaFox32:

Drone Configuration :

CPU : MP32

IMU : VRIMU 1.0

Radio : Jeti with PPM SUM 1 wire 12 channel.

ESC : HobbyWing 30A Pentium

Propeller : 10x4.5

CAM : Go Pro HD connected directoly above on battery support

Firmware : ArduPirates NG32 + MixerTable for HexFlight .

TX Video : 1.2 Ghz 200 mwatt pal video trasmitter tested until 340 m work fine.

Snapshot Source code for Hexa Radial :

http://code.google.com/p/multipilot32/downloads/detail?name=vrobotix-ide-0.0.4%20mixer%20hexaradial.zip&can=2&q=#makechanges


I'm working on this configuration for develop affodable platform for FPV and Aerial Video and Picture , this is minor Brother of VR Dragon. The next step test the Gimbal with my custom stabilization code.

Best

Roberto

Read more…

FOXTEAM PRESENT ARDUROV the sentinel of the deep

70859006?profile=RESIZE_320x320

Dear Friends,
FoxTeam after the development project Fox Hybrid , HG3.2 and support Arducopter with Hexafox project is' working on a new exciting project.
Ardurov, follo
wed some pictures of the first rendering of the ROV we're doing.

There 's a lot of work to do, if someone wants to join the development team of the project can' contact me at my skype address: virtualrobotix


70859067?profile=RESIZE_320x320


Read more…

70864549?profile=RESIZE_480x480

Dear Friends ,

the 07/04 will doing a online webcast where we present last updates of Multipilot32 project.

The index of presentation are :

  • Improvment of IDE and library , new functionality and new lib , i2c lib is available and work !! , now we support all standard diydrones accessories:).
  • Ready to use bin Example for testing your MP32 : Introduce Sensor Lab.
  • Pre Flight Check with Arducopter NG 32 and Multipilot 32.
  • Introduce new release of IMU and a RTF concept board.

Standard Fly configuration :

70865706?profile=RESIZE_1024x1024

This is the official link to join the event:

http://www.virtualrobotix.com/events/webcast-on-multipilot32

We're back in stock , so the board is available.

Link of offcial product page :

http://www.virtualrobotix.com/page/multipilot32-1

First Flight video with Arducopter NG 32 on ArmFox V.4.

Main Thread :

Status of the project you can found daily update :

http://www.virtualrobotix.com/forum/topics/multipilot32-vride-and-vros

Power Point Presentation of Official Multipilot32 presentation.

http://www.virtualrobotix.com/profiles/blogs/multipilot-32-power-point

Getting started usefull information about the board , tools ,libary and firmware available for developing code on Multipilot32

http://www.virtualrobotix.com/forum/topics/multipilot32-getting-started

Read more…

Blog Topics by Tags

Monthly Archives