All Posts (303)

Sort by

My first Aeroquad project

Gentlemen,

I'm working on my first quad.

My project is based on Aeroquad software with some changes :

- Arduino Mega board
- Sensor board is a Sparkfun 9DOF
- Integrated SD logger (blackbox)
- Venus GPS
- Lipo cell monitor
- GPRS telemetry

Frame is :
- 50 cm motor to motor (diagonal)
- brushless motor KD 2213-22T 17A 924Kv
- APC 10x4.7 propellers
- Spektrum 6 channels RC
- Weigth is 1.4Kg

Main idea is to move all sensors calculation to 9DOF board and use main Arduino cpu to perform other tasks.


Yesterday i did my first flight. I've changed Aeroquad source code to read raw sensor data from 9DOF on serial connection. It seems ok, i made many tests with Aeroquad configurator and it works.

Problem is : i'm not able to leave ground because quad flip over at 10cm from ground :(
Ok, i'm a RC newbie but i suspect something in wrong in configuration or software.

I'm just looking for help to make my first, quite stable, fligth and if possible, to compare my Aeroquad configurator data with a working (your) one.

I noticed a problem : in stable mode, with quad on my desk and throttle command only (50%) motors command in not equal on 4 motors but it's different. Is it strange, no ?

Please see attached screenshot of Aeroquad.

Many thanks to anyone who help me :)


Read more…

QuadFox Stable mode outdoor test


In this video is possible to see the incredible stability of DCM V3 developed by Jose Julio a member of Arducopter DEVTEAMIn this video I enjoyed playing with my QuadFox. Tell me your impressions. I ported this algorithm and the original code of Arducopter multipilot
hardware and controllers i2c hardware as well as original APM impressive
results in terms of stability in this video you can see how the
aircraft is stable and easily implementable
with automatic flight control systems, GPS, magnetometer, sonar and so on.
Congratulations to Jose and all members of the DevTeam. I am proud to help develop Arducopter project:) Thanks Chris for this opportunity and Jani:)
Regards Roberto
Read more…

QuadFox Stable mode test


This evening i finish to implement the code QuadFox on multipilot this is the first flight test. This code is a porting of Arducopter on my Multipilot board . The different respect of original project is I2C ESC , Mixertable that support Quad , Hexa , Okto , 20 Mhz of clock cpu instead of 16 Mhz and 1 wire RC input compatible wit jeti radio and Robbe - Futaba receiver 2.4 ghz. Other advanced feature is Multi Processor architecture for sonar, gps, magnetometer and ir sensor.

Check the stable mode at minute 4.20 :)

Great Job Arducopter DevCore Team ;) Next Step i would test GPS Hold .... Jose your new revision of DCM v3 ... work fine .. great job Jose ...
Read more…

Heavy tricopter

Together with a friend would like to build a heavy tricopter. We plan on using motors giving 6 kg thrust each. Does anyone have any suggestions or advice?ThanksPerry
Read more…

HG3.2 Preflight Check

Hello everyone,
in this video you can see the first pre-flight testing on the new HG3.2 the airplane has the following features:
Created by Joseph D'Angelo
Hardware and firmware development: Roberto Navoni
Electronic Edge: Ardubotix 1.0A (Multipilot)
Wheelbase: 1.65 m
Maximum dimensions: 2.60 x 2.60 m
V2 Version: hybrid
Electric Motor: Hacker A60
Petrol Engine: Zenoah
Blades: SAB Composite
Frame: DIY
Read more…

ArmQuad Y6


First flight of mini coax Tricopter.
These test are aimed at obtaining a reliable platform that can replace a helicopter r / c for shooting video and photos, especially the ability
to 'payload.
Thedesign will always recognizable at Y pilot orientation of the aircraft
at altitudes also important in addition to allowing shooting from
various angles without framing arms.

The motors arranged coaxially ensure redundancy in case of failure of one engine and / or regulator exc.

Greetings everyone,

Danilo


Primo volo del mini tricottero coassiale.
Queste sperimentanzioni sono finalizzate ad ottenere una piattaforma affidabile in grado di sostituire un elicottero r/c per le riprese video / foto, in particolare per la capacita' di payload.
Il disegno a Y renderà sempre riconoscibile al pilota l'orientamento del velivolo anche ad altezze importanti oltre a consentire riprese da varie angolazioni senza inquadrare i bracci.

I motori disposti coassialmente garantiscono ridondanza in caso di guasto ad un motore e/o regolatore esc.

Saluti a tutti,

Danilo

Read more…

ARDUROV PROJECT - REMOTE OPERATED VEHICLE

ARDUROV T100
- PRELIMINARY PROJECT ANALISYS -


Overview


ArduRov is an under water electrical vehicle controlled by the surface trough an umbilical cable, operator drive the Rov by the image of a camera and with the help of various sensors.
The goal of the project is the realization of a cheap ROV, a rock solid open source software, a modular design for a safe and easy use
The project could be divided in different parts, to be discussed and developed.


Surface Electronics


A small box with the power supply , Surface telemetry electronics and the video output
Options:
BASIC: A Simple Plastic Box with Input/Output connectors, PC or R/C Joystick
Advanced: A Case with LCD Monitor ,Telemetry Overlay or second LCD, A PlayStation JoyPad
PRO: A Consolle with HD Monitor, Overlay, DigitalRecording, Custom JoyStick etc


Umbilical Cable


To maintain a low cost the umbilical cable will be a standard multipolar PVC cable with at least 8 conductors, section of the conductor is to be defined depending to the final amps consumption.
My Idea is start with 50 mt of umbilical cable to avoid the needed of a winch to handle the cable.
All parts of the ArduRov Basic must be projected for a pressure of 20 bars (-200 mt)
Options:
BASIC: 30 mt of PVC 8 Conductor Industrial cable
Advanced: 100 mt of Kevlar armoured cable with hand winch
PRO: 200 mt of Kevlar armoured cable with motorized winch


ROV Frame


The frame must be as modular as possible, corrosion free, and with a low water drag.
For my experience the best way is use two polypropylene mono-block shoulder connected by Anticorodal Anodized “U” profiles. Carbon Fiber will be the next spet to reduce weight in air.
The profiles will be used to fix the thrusters, the underwater electronic pod, camera, lights etc
Options:
BASIC: polypropylene / Anticorodal frame
Advanced: Carbon Fiber/ Anticorodal frame
PRO: Full Carbon Fiber Frame with hydrodynamics surfaces
Buoyant System
To Compensate the weight of the ROV a buoyant system is needed, there are different method to add buoyancy but the most reliable will be the use of block of a special close-cell polymer.
A cheap solution could be polystyrene but it will fault at more than 5 bars (-50mt)


Options:
BASIC: polystyrene
Advanced: close-cell polymer
PRO: close-cell polymer with Carbon Fiber Coating

Thrusters


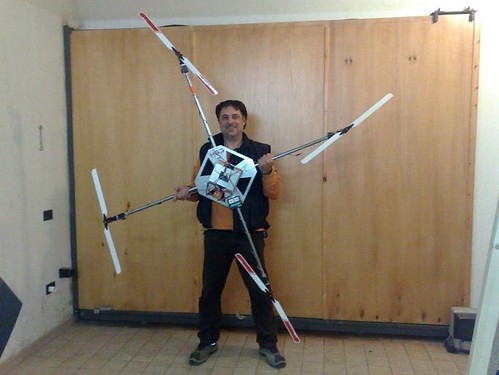
Propulsion is one of the most important thing in an ROV, We plan to use 3 , 5 or 6 thrusters to control the vehicle. Basically One or two thrusters are vertical and controls only the depth and eventually the tilt of the ROV and two or four thrusters are disposed on the same plane as in the following scheme:


This configuration allow Reverse , Forward , Left, Right and Rotation movements, to archive more thrust rear propulsion could be oriented differently.
The main problem of the thruster is the design of the underwater housing to resist at the pressure and at the same time not reduce the mechanical power, there are several different techniques to do this:
- Direct Shaft output with O-rings (cheap but with poor performance and frequently maintenance)
- Ceramic Shaft Seal with Oil Compensation ( Expensive and need special tools to fill oil )
- Magnetic Coupling with Dry Motor and magnetic Follower ( A bit more complicated design and project costs but virtually no maintenance and good efficiency )

Motor type should be Brushless sensorless, this type of motor can be controlled by an Electronic Driver and perform a good torque and a good power/dimensions balance.
We need to find a good motor with a very low Kv to have the maximum torque and reduce the RPM.
A good rpm speed could be around 2500 Rpm at full thrust.

Options:
BASIC: cheap R/C Brushless motor with direct shaft output with O-ring
Advanced: Industrial Brushless motor with hall effect position sensors and magnetic traction system
PRO: Custom Brushless Motor with hall effect position sensors and magnetic traction system


E-POD


Basically the epod in the brain of the ROV, is an Anticorodal cylinder with connection on both sides.
One side receive the umbilical cable and the other side have all output (Thrusters , camera ,lights etc).
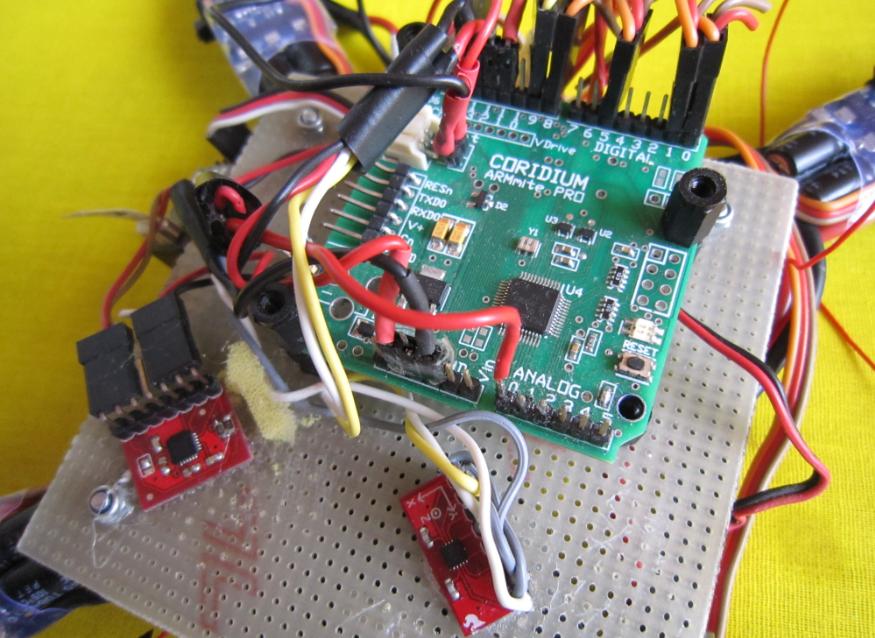
In the e-pod there is the electronic board and the Power conversion board to power-up the brushless motors and to convert Voltage to an appropriate value for all the equipment installed.
One part of the e-pod side will be reserved for sensors (Depth sensor, compass, temp sensor etc )


Options:
BASIC: Anticorodal cylinder with cast resin cable connections without sensors
Advanced: Anticorodal cylinder with underwater connectors + depth sensor and compass
PRO: Anticorodal vaacum cylinder with underwater connectors + depth sensor , compass , temp sensor , altimeter , and Lipo Power pack optional connector for UAV conversion.


Camera


Camera is the underwater “eye” of the pilot, could be standard 640x480 resolution or HD depending on the scope of the ROV. It is composed by an Anticorodal or Derlin Cylinder with a correction lens at one side and a connection cap at the other side. For standard resolution we will use a video-baloon converter/amplifier and a twisted pair to send video to surface.
Camera could be static or remote tilted to allow a panoramic view


Options:
BASIC: Standard 640x480 b/w camera with fixed focus and fixed iris
Advanced: Standard 640x480 color camera with fixed focus and fixed iris with remote tilt possibility
PRO: HD Camera with remote zoom , focus , Iris with pan and tilt possibility


Light


Lighting is very important underwater, especially in sweet water where you will be in the dark at few meters deep. A natural light is required for a good view and we can use halogen or led source for our purpose.


Options:
BASIC: 2 x halogen light with on/off control
Advanced: 2 x halogen light with dimmer control
PRO: 3 x halogen light with dimmer control

________________________

This is a very preliminary and personal analysis, feel free to comment, add, contest everything... and sorry in advanced for errors.

Taborelli Flavio

Read more…

FOXTEAM PRESENT ARDUROV the sentinel of the deep

70859006?profile=RESIZE_320x320

Dear Friends,
FoxTeam after the development project Fox Hybrid , HG3.2 and support Arducopter with Hexafox project is' working on a new exciting project.
Ardurov, follo
wed some pictures of the first rendering of the ROV we're doing.

There 's a lot of work to do, if someone wants to join the development team of the project can' contact me at my skype address: virtualrobotix


70859067?profile=RESIZE_320x320


Read more…

Professional Video HD by Hely


Aerial video.
Made in Italy by Foxteam applications of aerial photogrammetry and promotion of tourist destinations. The shootings have made some resorts in the Italian territory. For now, Google has not yet copied! , As it did with Google Earth and StreetView: (
Read more…

ArmQuad v.016 outdoor


I am continuing the ArmQuad software development.
I believe that soon I will release a ACRO software version with performance that can be seen in these 2 videos.

Ringrazio Roberto per aver creato questa community, aggregatrice di persone e idee che dimostrano nei vari loro progetti e sperimentazioni che anche l' Italia puo' dire la sua in questo ambito.

Saluti a tutti


Read more…

Closed Loop Simulation for Arducopter Debugging

Dear Friends
One of the problems in achieving the autopilot as Multipilot
Arduimu or is to be able to debug the more advanced features such as
stabilization, navigation waypoints and return to home without losing or
damaging the aircraft that are used to perform experiments respecting
the law
.

One technology to make this kind of testing is certainly the
simulator using the autopilot hardware connected to a PC running a
software as Physic Engine .


The main difference compared to other simulation systems for the world
Airplanes is that really advanced functions are performed by the
electronic cards which then will fly our model aircraft / UAVs.
The flight simulator is limited dall'autpilota to receive commands and
transmit new data to the electronic structure of autocontollo
consequently transmit simulator to teach new commands to actuators.

I thanks officialy Jason and Osborne for the work they have done on Ardupilot that was for me a source of inspiration.
One of the limitations that I found on Xplane as that It haven't the physic engine for Multicopter .

My initially idea was to use the simulator for debugging Arducopter code for GPS Hold and Navigation.

I'm 'working to a version that supports simulation code a bit
more professional written in Mathlab. The idea is to recive from the simulator the values of the raw acceleration sensors
and angular velocity and
static pressure and differential pressure. So i can check and debug more low level algorithm as acrobatic mode and PID configuration for stable mode.
Follow some video about my early test on this kind of technology.

In this video tutorial is possible to see the automatic stabilization , Return to home function


In this video is possible to see the waypoint definition and Navigation waypoint with autotakeoff and landing .


If someone would work with us for developing this kind technology we are happy to share with you are progress and technology.


P.S.
Thank you Jason for your support on APM and Xplane ;)

Regards
Roberto
Fox Team

Read more…

4373218270_45578d8746.jpg


This is the english translation of original Blog Post of Giuseppe D'Angelo for our international member

Hello everyone,

I joined this community, although I'm not sure how it works ... Forgive me if I make a few CZ! ;-)

However, I would make a small contribution with my modest experience.

Few years back, going on holiday by car, I was in the queue under the blazing sun,

I triggered the inspiration of the bird!

The quads were in their infancy, someone dared to put together some gyroscope, others deviated towards a sedge .... All very fascinating to me that I was starting my modeling career!

By trade I've always done and the technician AF, but micro-mechanics and electronics has always captured my attention.


On that hot July day, I called the phone my friend John, a veteran model maker, brilliant mind with notions of physical, take the first question ... why quads are so clumsy and unstable? Analyzing the characteristics attributed to all gyroscopes and especially latency in the correction of attitude, due to inertia of the engine block / helix.

How to improve this ... a quad variable pitch?, Yes ..

Leaving constant speed could vary the pace, to correct not expect the rotors take turns, but already had the motor system, it had a reserve of energy "Ready" to be converted by the variable pitch propellers, so everything is spinning as oil, in fact you could only use one engine for propulsion, with all the benefits that could arise.

Doing the math with the rotations and couples began the first problems that rose when they entered the game blends ... The project was aborted at birth ....

In the days that followed, and by re-quadricottero by the variable pitch did not want to abandon my mind and slowly, were overcome all the dark sides were holding at least theoretically grounded quad.

Resolved, though with reservations to check later, all the mechanical problems related to the management, I decided to try! By investing time and money in building a simulacrum, to test the theory.

I began to jot down some notes on building and designing the various parts of the main building, starting with the gearbox, which is the reduction and reversal of rotation

I tried to minimize costs, partly because there were those doubts fugabili unfortunately only with a test-fly ...

Earlier this year, and ... ready Mechanics, powered by two electric motors ... the missing pilot.

I started a new adventure for someone to make me a dedicated software for my maxi-quadricottero!

HG3 FEATURES:

4 propellers of 70 cm each propeller can be used up to 120 cm.

Dimensions: 2.50 x 2.50 m

Power supply: 12s Lipo

2 total engine power: 4400 W

Weight 6.5 kg take-off

Many people are frightened when he saw the car waiting just a bit of software, a project without a doubt very challenging but not impossible, I bought a bit of hardware and systems development, in despair, I tried the DIY, but obviously not programmer and 45 years can not be learned, including a trial period, the quad has been hung up for about two years, until I came across a forum, and in some RedFox ... The name did not inspire much confidence, but after all, I decided I felt too.

Contrary to his nickname Roberto, for me, is a nice person, very friendly, competent and humane!

There was now a certain feeling, and together in a few weeks, we have developed a hardware capable of driving my car, since then I baptized HG3.

Few tests are enough to understand that he could fly, and after the third try here are the results.

One of the tests

HG3 Willy

HG3 served to test my project and the control board, now left the table to be hung on a nail, giving way to his successor HG3.2

About HG3 find info here.

HG3.2 is a machine designed to "raise weight and experience other sources of propulsion ...

Particolare%20passo%20L.jpg


For now

Giuseppe D'Angelo

(Pipposoft)

HG3 the era of quad variable pitch has begun!
Hello everyone,
in this video you can see the first pre-flight testing on the new HG3.2 the Multicopter has the following features:
Created by Joseph D'Angelo
Hardware and firmware development: Roberto Navoni
Electronic Edge: Ardubotix 1.0A (Multipilot)
Wheelbase: 1.65 m
Maximum dimensions: 2.60 x 2.60 m
V2 Version: hybrid
Electric Motor: Hacker A60
Petrol Engine: Zenoah
Blades: SAB Composite
Frame: DIY
Read more…

Let's rock !

Let's rock !
It's time to start my first Quad build.

But before... i would like to really thanks Roberto for his helpfulness and his amazing work. Thanks my friend.

I'm a newbie in RC world, so my first step was to buy motors, ESC, batteries, charger and so on..
I'm waiting for that stuff orderer online, so at the moment my job is working on code to try to understand how it works.

My first project is based on Aeroquad firmware with Wii IMU and Arduino Mega (i already have that in my garage, so no reason to buy new stuff for the moment).

I modified last SVN release of Aeroquad 2.0 (R413) because it was not possible to build it with WiiIMU configuration.

I'm using Eclipse IDE to work on Arduino code.. few lines of code changed in main Aeroquad.pde file and i can use a real IDE to build code and upload it to Mega. Lol :)

I added this at the beginning :

// IDE Configuration
#define ECLIPSE_BUILD

and this before setup() :

#ifdef ECLIPSE_BUILD
// List of addition files
#include "FlightCommand.pde"
#include "FlightControl.pde"
#include "Sensors.pde"
#include "SerialCom.pde"

// This code is required if the project is being built under Eclipse
extern "C" void __cxa_pure_virtual() {
cli();
for (;;);
};

int main(void) {
/* Must call init for arduino to work properly */
init();
setup();
for (;;) {
loop();
} // end for
} // end main
#endif

It's very simple to switch between Arduino IDE and Eclipse IDE.. simply changing one #define.

A proposal to Roberto (probably to be forwarded to Aeroquad / Arducopter team guys) : why don't officially support Eclipse IDE in their projects ?

Congratulations to FoxTeam members for their amazing jobs.

Vittorio


Read more…

Blog Topics by Tags

Monthly Archives