All Posts (303)

Sort by

Dear Friend,

I'm happy to present the  prototype of Virtualrobotix thermal camera. 

In last months we work a lot on this new project , it's based on new Flir Lepton sensor and VR uBrain 5.1.

We implement an a specific firmware on uBrain for control the flir sensor , read image , trasmit it in realtime by USB or Bluetooth to PC or Mobile application.

The actual function supported in early prototype are : 

Live video streaming.

Recording on SD card.

Snapshot by event (push a button or specific programmable event).

We storage raw data and telemetry data from sensor so is possible to have a very detailed information about the temperature of all the point available in the image .

Is possible to analyse the image of VR Thermal Camera in realtime or in post processing with a specific appication. 

Actually we are developing specific application for our UAV especially for VR Spark as an alternative payload , actually we intend to propose this solution for video inspection in energy enviroment or solar field and a lot of other UAV or not UAV application if you are interested on this kind of technology contact me at : 

r.navoni@virtualrobotix.com

best

Roberto Navoni

Read more…

The official presentation of VR Spark 350 will take place at DroneShow Ferrara 28/29 March 2015.

The latest revisions of VR Spark 350, currently undergoing certification, will be presented on a confidential basis to some selected beta testers at the 2015 FIAPR convention.

VR Spark 350 was born after a year full of experiments, where we worked on improving electronic technologies, mechanical design, usability for end user and the possibility to be used for commercial purposes respecting regulation rules that govern the use of drones in the civil aviation world.

70925091?profile=RESIZE_1024x1024

We implemented control systems and flight termination to ensure compliance with the Italian and French rules and to achieve high levels of safety and reliability. It has a maximum take off weigh under 1.6 Kg. (3.4 pounds) to take advantage of the imminent FAA and European regulations that will enable smaller drones to fly in restricted areas.

We are currently undergoing experimentation to achieve Italian and French approval for commercial use, and plan to start selling in April.

VR Spark 350 main applications are:

  • low budget filmography.
  • safety and rescue.
  • Video inspection .
  • Marketing (drones branded for promotion - delivery -)
  • Automatic features as  follow me through VR platform Leash. (Action Sports)
  • Photogrammetry.
  • Training schools for professional pilots.
  • Suitable for drones startups company and research projects (eg H2020).

This multi role machine aims to enter as a protagonist in the business services using drones.
It has all the features to aspire to be the Italian answer to the Chinese DJI Phantom. The semplicity and portability of a DJI Phantom, but with so many more payload options and flexibility!

Technical Specification:

  • Frame configuration : Multicopter Quad .

  • Propeller:  9x4.5

  • Motors:  980 KV

  • Time of flight 18 min.

  • Weight : 1.6 kg al decollo.

  • Flight Control : VR Brain 5.2 PRO ( VR SPARK CUSTOMIZATION)

  • GPS : VR GPS 8 GNSS dual mode navigation system GPS / GLONASS.

  • Flight Termination System : VR Flight Stop PRO Power Cutoff + Parachute. (option)


  • Radio Link:

    • Primario: SBUS FRSKY X4R

    • Secondario: Terminatore di volo : PPMSUM FRSKY D4R


  • Telemetry:

    • FRSKY S.PORT.

    • VR Link 868 / 915 (Mavlink telemetry module)

    • VR OSD ( Video overlay main telemetry information : attitude , GPS , Battery)


  • Standard Payload 2 Axis Brushless Gimbal + GoPro 4 Hero Black.

  • PAYLOAD Option Max Weight ( 500 gr)

  • Battery 3S 4000 Mah.


70925305?profile=original

It is thanks to the work of a large community made up of people with great competence, passion and technological skill that this project has seen the light.

Thanks to Virtualrobotix and the APM:Copter DEV team which has done an excellent job bringing this platform to high levels that was, in its infancy, within the reach of only a few experts.

Now after extensive work on the simplification and usability, so many more professionals can enjoy the flexibility and power of this platform.

for info contact : info@virtualrobotix.com 

Read more…

This is the video of first fly test

Dear Friends,
with great pleasure we present the latest developments of the prototype # 1 of our first drone RTF.

The idea for this drone , began when Carlo a student  of the faculty of Industrial Design in Milan came to us to do her thesis ... we tried to think of something completely new and that it was not the classic drone MK or DJI 450.

In addition to the aesthetic aspect ,appreciated by the community, we have especially tried to make the drone in a very functional, easy to maintain, expandable with options which will be released in the future.
The frame initially was made with 3D printing, combined with inserts from epoxy glass and carbon fiber .

Our designer Carlo ... ,now officially came into VRI , with Flavio  studied the FEM of the drone to achieve a good level of resistance to twisting of the drone. Particular attention was held for the theme of the vibrations.

70898435?profile=RESIZE_1024x1024This is the BOD Logo.


The BOD have inside : 

  • VR Brain 4.5
  • GPS Ublox 6H
  • 3DR Radio
  • 4 30 Amp ESC with WiiEsc firmware.
  • use 4 T-Motord engines.
  • with 12 inch propelles.
  • 3S - 4S 4500 mah battery

The feature available are the same available in arducopter32 rev 2.9.3

  • Flight in acro and stable mode.
  • Loiter , return to home and auto navigation.
  • Auto landing and takeoff

After making the first  hovering Emile will take care to test it in order to put a little 'under pressure the drone.

Thanks to all the time for this great results :)

Best Regards
Roberto

Read more…

VR Copter Landing Gear now we have a new Option for our new frame. (raw video from VR LAB)

This video is doing by our VRGimbal user VR Gimbal with Sony 3D HXRNX3D1U ( 720 gr)  in handeld mode

This is a video using complete VRGimbal with Panasonic GH2

..and this is another video of the same copter (in HD)

70900920?profile=RESIZE_1024x1024

70901012?profile=RESIZE_1024x102470900988?profile=RESIZE_1024x102470900951?profile=RESIZE_320x320

Dear Friends,

after first batch of board available only for developer and hard work on firmware , hardware and software  we are ready for end user :)

These are specification of our : VR Gimbal :

Micro Controller is STM32F1 at 72 mhz.

3 Axis Brushless Direct Drive gimbal :

  • Roll    (MOT1)
  • Pitch  (MOT2)
  • Yaw    (MOT3)

For each channel we have 3 high power pwm 5 Amp output .

I2C IMU that support 3 axis . It  is on camera module , so we can know exactly the position of camera and control in realtime the 3 Brushless motors. MPU6050 (6 DOF) + HMC5883 (3 DOF)

1 USB port.

1 Serial port that support mavlink protocol.

1 Power module that support until 3S battery.

4 Radio RC Input for :

  • Control ROLL Setup.
  • Control Pitch Setup.
  • Control YAW Setup.
  • IR control repeater.

4 Analog Input 0-3.3v

1 IR Out , so is pssible to control a remote camera by its ir receiver.

On new revision 2.0 we add :

  • customizable push buton.
  • support for motors ampere  monitor for each motors.
  • Very intuitive Firmware update tools.
  • Simple and powerfull VR Gui for VR Gimbal configuration.
  • Serial driver on USB port.
  • A complete and updated wiki repository with media gallery with last video from our user.


In this video is possible see the utility available for measure the current used by different kind of motors. This feature is very usefull for evaluate the specification of motors.


Is available a new tools for firmware update you can found more detail here  :

https://vrgimbal.wordpress.com/quick-start-guide/firmware-upgrade/

Last revision of code is 1.0.5 this is good for end user all function of standard brushless gimbal is available and is possible also to manage the 3th axe using rc radio. This firmware is a porting and BruGi_049B_r161

  • Completed PID mode on Roll and Pitch, with support of RC commands.
  • Manual (RC) mode (to be used on Yaw for now) working but requires improvement.
  • USB serial support (see vers. 1.04)

more info is available here :

https://vrgimbal.wordpress.com/download/vrgimbal-1-05/

The firmware is opensource the repo is available here :

http://code.google.com/p/vrgimbal/

So if you want to join in development you are welcome .


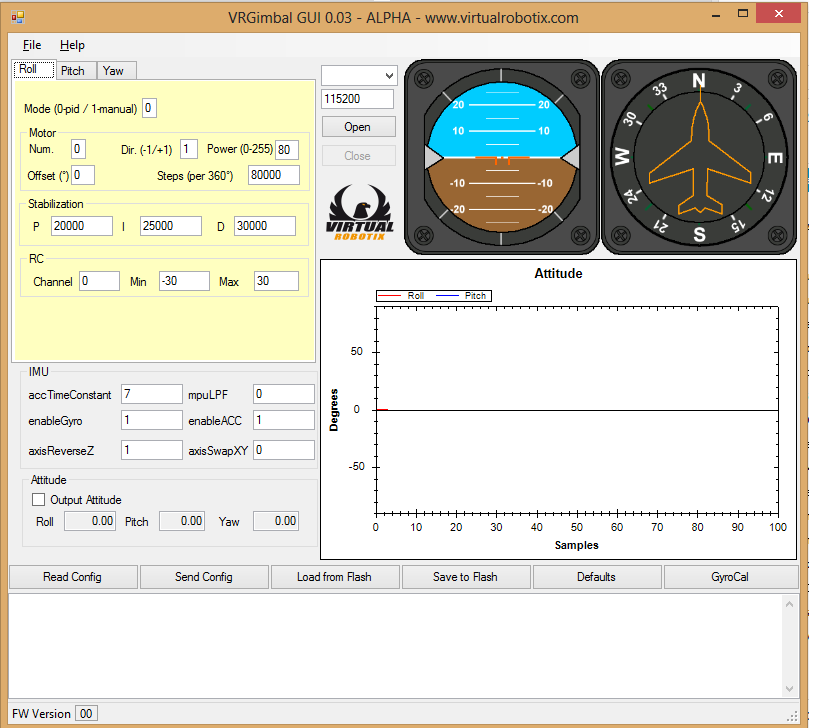
This is a screenshot of VR Gimbal Gui developed using .net technology, so could be work also using mono on mac and linux , test on that platform is welcome ,you can connect directly by usb to VR Gimbal or by radio link as 3dr module , blueetooth or other ttl wireles adapter :


vrgimbalnewgui.png?width=550

With VRGimbal is possible to control this kind of gimbal ;

Handheld and Air Drone Gimbal 2-3axis Entry level gopro gimbal.

Handheld and Air Drone Gimbal 2-3axis Heavy dslr gimbal.


This is an example of video doing by our user of VRGimbal on heavy dslr gimbal :

This is official thread in virtualrobotix community is here join us for have more info and support :

http://www.virtualrobotix.com/group/vr-gimbal-user-group?xg_source=activity

For reserve and pre order your VR Gimbal 2.0 board send a mail here :

info@virtualrobotix.com

The first board will be available in begin of September we have only 70 boards available at stock for our user.

We can also support our user in custom development  on oem - odm gimbal hardware or firmware contact us for more detail.

Read more…

Yesterday I had a few tests with our Tiger Shark in Octa Quad configuration.

The tests were made to see how the copter would cope the loss of one or two propellers.

http://youtu.be/Tc6N0DbBT7M


Obviously the test was in a ideal condition where the propeller just loosens and falls off the Octo.

The test was done by removing first 1 propeller, then two propellers spinning in opposite and same direction.


Without 1 propeller the copter flew as it had all the propellers. There was no feeling of something wrong. It took off and landed easily.


Taking off two propellers spinning in the same direction (lower front left and lower back right) resulted in a copter that in take-off yawed a little. Once the I term build up, it was perfectly straight. It was a little unstable due to the fact that two arms were "stronger" than the others, but generally it was perfectly stable even with some wind.

http://youtu.be/QIeawL1K244


Taking off two propellers spinning in same direction (lower front left and right) resulted in a copter trying to move forward with quite a pace. I took a little pitch back to keep it still, but the overall stability was amazing.....


X8 will not take the loss of two propellers on the same arm, that would result in a crash, unless the recent algorithm gets published and then implemented in ACM code. :)


The code is based on APM:Copter 3.1.2 but runs on VRBRAIN.

Propellers are 13x5 T-motors on the upper and Graupner 13x8 on the lower.

Motors are 3508-700KV with 10Ah 4S battery.

Total weight was about 3.0 Kg.


Thanks to VirtualRobotix.it for the frame and the electronics, and thanks to the APM:Copter dev team that allowed us to fork and use their code, that is progressing fastest than speed light!


Cheers,

Emile


Read more…


Dear Friends,

VR Lab is happy to present our last updates in the project  in last week we doing a great upgrades :

The entry level mechanical GoPro gimbal is ready , in the video you can see the first test, It's very simple to balance the camera to obtain better result.

The VR Gimbal is ready for developer we put online the opensource repository , in the next days will be update with recent workspace : library and code the code is compatible wit VR Universal IDE .

https://code.google.com/p/vrgimbal/

Today we finish to implement the first version of code that manage motors on pitch , roll and yaw . In the first test we are using only P not yet ID for improve corretion but  the result is yet very good , in the nexts days put online new video:)

Now is possible to setting the parameter with a serial port interface : sensor calibration , PID , on and off of motors , power for control the motors , step / degree ecc ecc . We start to develop a console for end user. We would use mavlink for interconnect the Gimbal to Console application ... in our test we are yet using also 3DR Radio and it work fine !

For more info and live update check here :

http://www.virtualrobotix.com/group/vr-gimbal-user-group?xg_source=activity

Best

Roberto


Read more…

70911333?profile=RESIZE_1024x1024

Today i create a Google Community Group for manage the beta testing of VR Pad Station this is the link : 

http://plus.google.com/communities/102697330643558260161

This is the official Virtual Robotix Discussion group about VR PAD Station 2.0 :

http://www.virtualrobotix.com/group/vr-pad-station-2-0

We upload the last revision of VR radio RC . The new name is VR PAD Station 2.0 . We integrated the mavlink 1.0 telemetry function with original Virtual RC project so now is possible to use VR PAD Station as tools for :

  • Receive telemetry from drone.
  • Setting Parameter .
  • Change Flight Mode.
  • Set waypoint.
  • Send direct command as Return to Landing point , Land or Guided mode.
  • Virtual Remote control with a lot of advanced feature for setup the radio stick

We are work in progress with some advanced feature as Special Follow me mode , Fligh log book and VR Gimbal integration.

The App is compatible with APM Copter , Plane and Rover.

Inside the community could be possible discuss directly with developer about the new request feature .

After join the community could be possible download the APK in a special section of  google play

This is the direct link to google play store beta registration: 

https://play.google.com/apps/testing/com.laser.VrPadStation

If you yet register in the community appear this message .... 

70911381?profile=RESIZE_1024x1024

If your registration accepted you can download the beta testing of our application :)

.

70911502?profile=RESIZE_1024x1024

Feedback about our application are welcome ... :) In the next week we intend improve a lot the application with new feature under development.

Best

Roberto

Read more…

Dear Friends,

this is the first test of VR Gimbal that control 3 axis ... it's only pre alpha revision of code. 

At the end of this week 31 / 05 / 2013

We finish to implement the VR Gimbal LT library .

  • The i2c imu with mpu6000 + hmc5883 work fine .
  • The SPI imu with mpu6000 + hmc5883 work fine.
  • The 3 driver motors work fine : we check at different refresh rate and with different qty of force.
  • Radio decoder library work fine : with ppm and ppmsum.
  • AP_LIB work good and save the parameter on internal eeprom .

Now start to implement 

PID control and FORCE control lib ... in this video is possible to see the first revision of firmware with the pre alpha code . Not yet available PID only P control and we are using same code used in the past for contol servo with external potentiometer.

In the next week start to work on complete PID control and absolute control approach.


with this version of firmware we are testing : 

  • if imu on i2c work fine .
  • if the hardware motor work fine .
  • if the 3° axis control work togheter with other axis without problem.
  • if the serial port for setting parameter working fine . We test also wireless control of gimbal and all work fine.
  • if the radio encoder work fine.
  • if the ap_parameter work and is serialize right in eeprom.


All is ok so the board is ready for prodution :) That's good step for us :)


So in this early test on 3° axis we found that we need more force on 3° motor on yaw respect of other 2 axis when we are in limit situation . So wee need to use bigger motors with more couple. 

About the developer sorry for delay but before to confirm the start of pre order we prefer finish to test electronic board of first batch .

For more info check here :

http://www.virtualrobotix.com/group/vr-gimbal-user-group/forum/topics/vr-gimbal-3-axis-32bit-direct-drive-gimbal-controller?xg_source=activity

Best

Roberto Navoni

Read more…

In the video we present the development process of new technologies within the VR Lab.

70902616?profile=RESIZE_1024x1024

The first step is to evaluate different potential ideas at this stage and a lot of importance 'given to the design, Italy  known for great design studios and even within our group we have creative people who represent the future of italian design, the best choice is to be able to develop a mechanical level the product, check through the simulation that the drone is able to withstand the stresses to which it will be subjected during the flight and then verify the integration of the mechanical components with electronic ones.

70902661?profile=original


Once you've designed the drone virtually, we make the first prototypes with 3D printers and carry out flight tests and validation.

70902651?profile=RESIZE_1024x1024


A long and complex process but in the end a great satisfaction to see a materialized our dream.

70902716?profile=RESIZE_1024x1024

Ready for pre-order Fall 2013!!! ;-)

more info will be available in the next weeks

Best

Roberto Navoni

Read more…

LPD Power lipo battery 22000mAh/25C-6S

Model No.: LPD22000/25-6S

Typical capacity : 22000mAh

Typical Voltage: 22.2V

Dimensions: 66×91×198mm

Approx Weight: 2544.0g

Plug: Banana Plug and T-Plug

Continuous Discharge Current: 25C

Burst Discharge Current: 50C

Charge Rate: 1-3C Recommended, 5C Max

RC Lipo Battery Pack is built with the highest quality single cell that engineered and optimized specifically for RC planes and RC cars.Unmatched energy and power density has increased the flight time (about twice as long as NiMH packs). Comparing with NiMH or NiC packs,significantly decreased weight and smaller physical size easily fit in your RC aircraft. No memory effect. The ability to supply current is at high rate.


Product Advantages:

    (1) Adopted the world's key material-LiCo02.

    (2) Used fully automatic lamination machine with Nano Tech.

    (3) Long cycle life more than 500 times.

    (4) Lighter, high safety without fire and explosion 6. Being covered by PICC.

Read more…


Today i recived this mail , I would share it with the member of Dev Team , Thanks a lot :)

Hello,
It is with great pleasure that I send you this news.
There has been a project in Portugal in which an autonomous boat and hexacopter cooperate for monitoring of rivers. http://riverwatchws.cloudapp.net/

We just recently have been mentioned in Hack a Day http://hackaday.com/2014/01/30/riverwatch-an-autonomous-surface-aerial-marsupial-robot-team/
The hexacopter uses the VrBrain as it's controller, and some additional hardware. I thought you would be happy to know about this usage of the VrBrain and maybe help share it.
Thank you so much for reading and for all the work you have put into this.
 Paulo Rodrigues

Thank you too Paulo and at your team for this great work :) 


This is the Post on hackaday :)

cata.jpg?w=580&h=341


Every once in a while we get a tip for a project that really, really, really blows our minds.This is one of them.

It looks like a basic catamaran with a few extra bells and whistles — except it is so much more than that. You’re looking at a fully Autonomous Surface Vehicle, complete with a piggybacking 6-rotor UAV. It’s decked out in cameras, sonar sensors, laser rangefinders, high accuracy GPS-RTK tracking, an IMU, oh, and did we mention the autonomous 6-rotor UAV capable of taking off and landing on it?

It all started out as a simple experiment within ECHORD (the European Clearing House for Open Robotics Development), and since then it has become a fully funded project atUNINOVA, a Centre of Technology and Systems in Portugal.

The purpose of the mind-blowing robot team is to collect data of river environments — think of it as Google Maps 2.0 — which is almost an understatement for what it is capable of.

You seriously have to watch the video after the break.

Read more…

70897517?profile=RESIZE_1024x1024


70897645?profile=RESIZE_1024x1024

70897760?profile=RESIZE_1024x1024


Dear Friends,

after one week of work to first sample of electronics , we are ready with workspace enviroment for developer that want join our team.

Electronic Specification: 

In VR Gimbal We decide to use this kind of electronic parts  :

  • as micro we use STM32F1 64 pin.
  • 1 MPU6000 + HMC5883 for Z axis Direct Drive CAM using i2c bus.
  • 1 MPU6000 on spi bus. for Roll and Pitch cam.
  • EEPROM for storage the parameter of gimbal.
  • 3 ST Driver for manage 3 Brushless Motors with 9 Hardware PWM Output.
  • 1 input for Ublox GPS.
  • 4 PPM Radio Input or 1 PPMSUM radio input until 8 channel or more.
  • 1 Telemetry port for mavlink control.


As developer enviroment we use VR Ide Universal (based on eclipse) compatible with VRBRAIN and MP32 board now also with VR GIMBAL.

The developer lib and hal at the begin will be compatible with our APM_LIB ported to STM32F1 library the same used on MP32F1 board. 

That support all the APM library available and arduino language sintax .


In our code we decide to port on VR Gimbal :

  • AP_COMMON
  • AP_VAR
  • AP_InertialSensor
  • AP_IMU
  • AP_Camera
  • AP_Mount
  • Mavlink


and other utility yet available on our standard F1 package ... 


We would develop also a utility for manage the board from 


If you are interest to join our work in developing stage will be a special price for you of 75 euro of 3 axis control board + 15 euro for IMU  (at the moment is available only 20 board) .


You name will be in the list of developer of this great project. The code will be opensource as other in this great community ... the support in development and donation are welcome .

For more info about the project contact me at info@virtualrobotix.com

In our roadmap the first  stable version of code will be available in 1 month. 

In the next week will be available the enviroment , with hal and library , then starting to implement the code functionality for manage the first opensource 32 bit 3 axis direct drive.

I hope that you like our project and join us in development.

In VR Lab mecatronix group are working hard and is yet available a good gimbal for GOPRO


70897769?profile=RESIZE_1024x1024


70897775?profile=RESIZE_1024x1024


70897861?profile=RESIZE_1024x1024

70897786?profile=RESIZE_1024x1024


And also is coming Gimbal for pro and semi pro camera.

I hope that you like our work :)


Best

Roberto Navoni

for more info : http://www.virtualrobotix.com/group/vr-gimbal-user-group?xg_source=activity

Read more…

70925742?profile=RESIZE_1024x1024

VR Spark 350 born after a year full of experiments, where we worked on improving electronic technologies, mechanical design, usability for end user and the possibility to be used for commercial purposes respecting regulation rules that govern the use of drones in the civil aviation world.

We implemented control systems and flight termination to ensure compliance with the Italian and French rules , now start to work on U.S to achieve high levels of safety and reliability. Current configuration with Brushless Gimbal , GoPro 4 and Parachute is 1.3 kg . It has a maximum take off weigh of 1.8 Kg. (3.4 pounds) to take advantage of the imminent FAA and European regulations that will enable smaller drones to fly in restricted areas.

We are currently undergoing experimentation to achieve Italian and French approval for commercial use, and plan to start selling in April.

We are searching partner that want support us for VR Spark Section 333 FAA certification.

for info contact me by skype my account is : virtualrobotix or at my email r.navoni@virtualrobotix.com I'll be present during ELC Technical Showcase in San Jose.

VR Spark 350 main applications are:

  • low budget filmography.
  • safety and rescue.
  • Video inspection  .
  • Marketing (drones branded for promotion - delivery -)
  • Automatic features as  follow me through VR platform Leash. (Action Sports)
  • Photogrammetry.
  • Training schools for professional pilots.
  • Suitable for drones startups company and research projects (eg H2020).

Example of filmografy :

Example of our Flir based Thermal image sensor :

This multi role machine aims to enter as a protagonist in the business services using drones.
It has all the features to aspire to be the Italian answer to the Chinese DJI Phantom. The semplicity and portability of a DJI Phantom, but with so many more payload options and flexibility!

This is last Technical Specification: (Updated) 

  • Innovative Italian Design and special painting technology. 
  • Frame configuration : Multicopter Quad .

  • Propeller:  9x4.5 Option 10x4.5 

  • Motors:  980 KV

  • Time of flight 18 min.

  • Weight : 1.3 kg in full  configuration Gimbal , GoPro 4 Camera and Parachute .

  • Flight Control : VR Brain 5.2 PRO ( VR SPARK CUSTOMIZATION)

  • GPS : VR GPS 8 GNSS dual mode navigation system GPS / GLONASS. until 18 sat and HDOP < 1.5

  • Flight Termination System : VR Flight Stop PRO Power Cutoff + Parachute. 

70925865?profile=original

Luca ... The Flight Stop work fine ? ... Opsss :) 

  • Radio Link:

    • Primary: SBUS FRSKY X4R

    • Secondary: Flyght Stop : PPMSUM FRSKY D4R

  • Telemetry:

    • FRSKY S.PORT (Telemetry information available on Taranis display LUA Script customizable ) .

    • VR Link 868 / 915 (Mavlink telemetry module)

    • VR OSD - option -  ( Video overlay main telemetry information : attitude , GPS , Battery)

  • FPV Functionality : 
    • CCD camera integrated in the drone .
    • 5.8 Ghz Video TX .
    • Video Switch between the FPV Camera and GoPro 4 .
  • Voltage and Hall effect Current sensor integrated on distribution board.
  • Standard Payload 2 Axis Brushless Gimbal + GoPro 4 Hero Black.

  • PAYLOAD Option Max Weight ( 500 gr)

  • Battery 3S 4000 Mah.

  • Special Drone Code 1st Meeting version support on board RaspberryPi . 


70925305?profile=original

It is thanks to the work of a large community made up of people with great competence, passion and technological skill that this project has seen the light.

Thanks to Virtualrobotix and the APM:Copter DEV team which has done an excellent job bringing this platform to high levels that was, in its infancy, within the reach of only a few experts.

Now after extensive work on the simplification and usability, so many more professionals can enjoy the flexibility and power of this platform.

for info contact : info@virtualrobotix.com 

Read more…

Example of VR Drone configuration : Tiger Shark in X8 configuration + VR Gimbal + VR Easyshot the camera is an Nex6

An onboard video from Tigershark see the quality of loiter in azimutal video :)  The Flight board is a VRBrain with APM Copter revision 3.1.13

http://www.virtualrobotix.it/index.php/en/prod/vr-brain


These are some video example from our user more available here :

http://vrgimbal.wordpress.com/videos/


vrgimbal2_front.jpg


After one year of development Gimbal VR has become a stable product.

The latest revision of firmware, we have implemented several functions to make more 'precise and reliable control of brushless gimbal.

http://vrgimbal.wordpress.com/download/vrgimbal-1-13-2/


In addition to improved hardware and firmware have also worked a lot on the mechanics of these two gimbal one dedicated to compact cameras and another for professional cameras.

easyshot9.jpg?width=650

http://www.virtualrobotix.it/index.php/en/prod/gimbaleasy


gimbal1.jpg?width=650


IMG_0438.jpg


The VRGimbal is the only 3-axis  opensource gimbal board. Last update is available here.

http://code.google.com/p/vrgimbal/

If you want help us in development join us :)


The goal of the project is complete integration between the autopilot that use  APM code Copter, Plane and Rover to develop complex functions such as object tracking.

It 'available on the wiki APM is an example of how to integrate VRGimbal with cards based on how VRBrain APM, APM 2.6 or Pixhawke.


70909206?profile=RESIZE_1024x1024


Randy join in test and developing of VRGimbal and add this page to APM WIKI :

http://planner.ardupilot.com/wiki/common-vrgimbal/

This is official VR Gimbal wiki page. 

http://vrgimbal.wordpress.com/


Join us to official discussion group :

http://www.virtualrobotix.com/group/vr-gimbal-user-group


The board is available you can buy it at : 

http://www.virtualrobotix.it/index.php/en/shop/gimbal-control-board/vrgimbal-3-axis-detail


Original blog post : 

http://www.virtualrobotix.com/profiles/blogs/vr-gimbal-1-year-of-development-last-update-of-the-project


if you need more info contact us at : info@virtualrobotix.com


Best

Roberto

Read more…

70919140?profile=RESIZE_1024x1024

After the VR micro Brain 5 we finally present you the VRBrain 5.
We had to work a lot on the operating system, new drivers and all the infrastructure to support the mission planner firmware repository, this is why it took so long to release the board.

Today the board is available on the store.
Here are the first pictures of the OEM version, I prefer to show you the board without enclosure because  it's a jewel of technology :)

It will initially be available in the basic version, and only for more experienced users that will join our advanced developer program we will have available a version that supports up to 3 IMUs with (Accelerometers , Gyroscopes , Magnetometer and barometer ) and also support up to 2 VR Multiconstellation GPS Ublox 8. 

The board has an on board CAN Bus driver, an SD Card and it's driven by the NuttX RTOS real-time operating system.

It natively supports Futaba and FrSky SBUS receivers (up to 18 channels) and will support Spektrum satellites 

Full tech specification :

Hardware:

  • CPU:
    • ARM CortexM4F microcontroller with DSP and FPU.
    • 1024KiB di flash , 192KiB of RAM.
    • 1 SD Card Slot support until 64 gigabyte.
    •  Jtag support for onboard realtime debugging.
  • IMU Sensor:
    • mems accelerometer and gyroscope (different option , available pro certify ,too ) 
    • barometer with  10 cm resolution.
    • 2  SPI expansion BUS for optional IMU
    • 1  sonar input.
  • RC 
    • 6 RC INPUT standard PPM.
    • 1 PPMSUM 
    • 1 ARM Switch
    • 1 SBUS input compatible with  Futaba and  FRKSY technology. 
    • 8 RC output ( 60 - 490 hz ) , 4 optional RC output ( in SBUS mode)
  • Expansion BUS
    • 1 CAN BUS .
    • 2 serial port for interface VR GPS Ublox 8
    • 1 i2c bus for magnetometer connection.
  • Additional IN - OUT
    • 3 Output Switch digitali (ULN2003) 2 LED 1 BUZZER.
    • 1 input for voltage control.
    • 1 input for current control.
  • Dimension 6x4.
  • Available plastic and aluminium case as option.

IDE and development kit . 

  • Eclipse IDE.
  • Arm GCC Toolchain.
  • Support real time debug .

Firmware:

For this platform are available many libraries developed by the community Virtualrobotix and Diydrones. 

Native support of the operating system Nuttx rev 6.20 to 7.30. 

Bootloading and Automatic Update standard and custom firmware. 

Repository Server with native support Mission Planner 32 and 64 bit.

The supported UAV firmware are  : APM Copter, Plane and Rover

Our dev team support and improve VRBrain NuttX operating systems and AP_HAL_VRBRAIN . The Hardware Abstraction Layer for integration with APM firwmare enviroment. 

The mini site is available at : 

http://vrbrain.wordpress.com/

For more info send a mail to : info@virtualrobotix.com


The link where you can buy the board and find more info is this: 
http://www.virtualrobotix.it/index.php/en/shop/autopilot/vrbrain5-detail

For this product is available a professional customer support program. University and Research Lab use VRBrain 5 in advanced research project. Join to our pro dev team today :) Some company that want certify their drone ask the support to our dev team for support during the qualification test .

For more info send a mail to info@virtualrobotix.com 

Read more…

Debug VRbrain con ARM-USB-OCD-H by Olimex

Cercherò di spiegare come sono riuscito a configurare il debugger Jtag.

I will try to explain how I managed to configure the JTAG debugger.


Youtube video : http://youtu.be/AAGP1Vnus58


Prerequisiti:

1)Sistema di sviluppo VrBrain (eclipse etc.) installato e funzionante

2)Il debugger Jtag OLIMEX ARM-USB-OCD-H

3)Cavo di collegamento debugger -> Vrbrain.


Prerequisites:1) System development VrBrain (eclipse etc.) Installed and running2) The JTAG debugger OLIMEX ARM-USB-OCD-H3) Connection cable for debugger -> Vrbrain.


Incominciamo dal cavo, il pin-out da seguire e il seguente :

Let's start from the cable, the pin-out to follow and the following:


VRBRAIN                                            DeBugger

3V3  (01) --------------------- (01) VREF
GND  (03) --------------------- (04) GND
GND  (05) --------------------- (06) GND
GND  (07) --------------------- (08) GND
GND  (09) --------------------- (10) GND
TMS  (02) --------------------- (07) TMS
TCK  (04) --------------------- (09) TCK
TDO  (06) --------------------- (13) TDO
TDI  (08) --------------------- (05) TDI
TRST (10) --------------------- (03) TRST 


Il secondo passaggio e configurare Eclipse per poter utilizzare il nostro debugger.

Per cui

1° HELP-->Install New Software installare dalla sorgente :  Zylin - http://opensource.zylin.com/zylincdt il plugin Zylin Embedded CDT

2° Installare il pacchetto Olimex ODS IDE scaricabile dal sito olimex

3° Scaricare la verione 0.7 del OpenOCD dal sito http://www.freddiechopin.info/pl/download/category/4-openocd?download=99%3Aopenocd-0.7.0  (Questo perche le Openocd fornite da Olimex non sono aggiornate a questa versione che supporta il processore della vrbrain.)

4° Sconpattare il file appena scaricato nella cartella C:\OlimexODS\openocd-0.6.1 (Se avete mantenuto i path standard) in questo modo sfrutteremo le nuove librerie e file di configurazione della cpu.

5° Aggiungere al Path di sistema "C:\OlimexODS\openocd-0.6.1\scripts\chip\st\stm32"


The second step and configure Eclipse to use our debugger.whereby HELP -> Install New Software install from source: Zylin - http://opensource.zylin.com/zylincdt the plugin Zylin Embedded CDT Install the package Olimex ODS IDE downloaded from the website olimex3° Download the 0.7 version of OpenOCD from the site http://www.freddiechopin.info/pl/download/category/4-openocd?download=99 3Aopenocd-0.7.0

(This is because the OpenOCD provided by Olimex are not updated to this version that supports the processor vrbrain.) Unzip the file you just downloaded into the folder C:\OlimexODS\openocd-0.6.1 (If you kept the standard path) in this way we will use the new libraries and configuration files of the cpu. Add to System Path "C:\OlimexODS\openocd-0.6.1\scripts\chip\st\stm32"


Adesso Iniziamo a configurare il Debugger di Eclipse :


1° -->External Tool Configuretor

2° New Launch Configurator ... vi allego le immagini delle varie schermate e copiatevi i parametri.


Now begin to configure the Eclipse Debugger:  --> External Tool Configuretor New Launch Configurator ... I am attaching pictures of the various screens and copy the parameters.

12232299456?profile=original


12232299289?profile=original


3° Inpostiamo il Debug Configurator ... vi allego le immagini ... copiate i parametri.

 Set the Debug Build ... I am attaching pictures ... copied parameters.


12232299856?profile=original


Initialize:

target remote localhost:3333
monitor reset halt
monitor wait_halt
monitor sleep 100
monitor poll
monitor flash protect 0 0 11 off
load build/laserlab_MP32V1F4.elf
monitor sleep 200


Run:

symbol-file  build/laserlab_MP32V1F4.elf
monitor soft_reset_halt
monitor wait_halt
monitor poll
set breakpoint auto-hw on
info breakpoint
continue


12232300658?profile=original12232300854?profile=original12232300886?profile=original4° Ora create nella directory C:\vr-universal-ide\workspaces\UF4_AP\ACopter32_2.7_Beta1_VRBRAIN un file project.cfg con il notepad il testo seguente

Now create the directory C:\vr-universal-ide\workspaces\UF4_AP\ACopter32_2.7_Beta1_VRBRAIN project.cfg a file with notepad the following


# Find the board config file in the scripts/board/  directory

gdb_memory_map enable
gdb_flash_program enable

source [find scripts/board/olimex_stm32_e407.cfg]


(per inciso questo file di conf richiama soltanto il scripts/target/stm32f4x.cfg che e quello che ci serve ... )

5° ora editiamo il file C:\OlimexODS\openocd-0.6.1\scripts\target\stm32f4x.cfg  perchè i nostri amici di Openocd si sono dimenticati due volete un '3' ... quindi vi allego il testo del file da sostituire all originale


(this conf file only addresses the scripts/target/stm32f4x.cfg and that what we need ...) now edit the file C:\OlimexODS\openocd-0.6.1\scripts\target\stm32f4x.cfg because our friends OpenOCD they forgot two want a '3 '... then I am attaching the text of the file to be replaced to original


# script for stm32f4x family

if { [info exists CHIPNAME] } {

set _CHIPNAME $CHIPNAME

} else {

set _CHIPNAME stm32f4x

}

if { [info exists ENDIAN] } {

set _ENDIAN $ENDIAN

} else {

set _ENDIAN little

}

# Work-area is a space in RAM used for flash programming

# By default use 64kB

if { [info exists WORKAREASIZE] } {

set _WORKAREASIZE $WORKAREASIZE

} else {

set _WORKAREASIZE 0x10000

}

# JTAG speed should be <= F_CPU/6. F_CPU after reset is 8MHz, so use F_JTAG = 1MHz

#

# Since we may be running of an RC oscilator, we crank down the speed a

# bit more to be on the safe side. Perhaps superstition, but if are

# running off a crystal, we can run closer to the limit. Note

# that there can be a pretty wide band where things are more or less stable.

adapter_khz 1000

adapter_nsrst_delay 100

jtag_ntrst_delay 100

#jtag scan chain

if { [info exists CPUTAPID] } {

set _CPUTAPID $CPUTAPID

} else {

# See STM Document RM0090

# Section 32.6.2 - corresponds to Cortex-M4 r0p1

set _CPUTAPID 0x4ba00477

}

jtag newtap $_CHIPNAME cpu -irlen 4 -ircapture 0x1 -irmask 0xf -expected-id $_CPUTAPID

if { [info exists BSTAPID] } {

set _BSTAPID $BSTAPID

} else {

# See STM Document RM0090

# Section 32.6.3

set _BSTAPID 0x06413041

}

jtag newtap $_CHIPNAME bs -irlen 5 -expected-id $_BSTAPID

set _TARGETNAME $_CHIPNAME.cpu

target create $_TARGETNAME cortex_m3 -endian $_ENDIAN -chain-position $_TARGETNAME

$_TARGETNAME configure -work-area-phys 0x20000000 -work-area-size $_WORKAREASIZE -work-area-backup 0

set _FLASHNAME $_CHIPNAME.flash

flash bank $_FLASHNAME stm32f2x 0 0 0 0 $_TARGETNAME

# if srst is not fitted use SYSRESETREQ to

# perform a soft reset

cortex_m3 reset_config sysresetreq


OK FINITO!

OK FINISHED!


Ora per fare il debug lanciate dal menu di eclipse "external Tool" la configurazione creata prima con il nome ARM-USB-OCD-H, ricordatevi che il debugger deve essere collegato alla vr-brain sul connettore jtag, la vrbrain deve essere alimentata ... e il ponticello per entrare nella modalità "download firmware" non deve essere rimosso.


Fatto questo lanciate da Eclipse il debugger STM32 che abbiamo creato prima e voilà ... compilazione del codice, creazione del file, download del firmware su vrbrain, reset tutto in automatico .... e ... buon debug a tutti.


P.s I breakpoint non si possono mettere nei file arduino .pde ... per ora io sto inserendo i breakpoint nella main.cpp che e un file cpp nativo e che viene generato in automatico dal make ... in pratica unisce in un unico file tutt i file arduino. Messi li i breakpoint funzionano correttamente e potete interrompere dove volete l'esecuzione della vrbrain e controllarvi le variabili etc.

Con l'ausilio di Roberto e Emile stiamo cercando di ovviare al problema.


Now to debug launch menu eclipse "external tool" created before the configuration with the name ARM-USB-OCD-H, remember that the debugger must be connected to the JTAG connector on the vr-brain, the vrbrain must be supplied. .. and the bridge to enter the mode "download firmware" should not be removed.Once this is done run the debugger from Eclipse STM32 we created earlier and voila ... compiling your code, create the file, download the firmware on vrbrain, reset all automatically .... and ... good debugging at all.Ps. you can not put breakpoints in files arduino. Pde ... for now I'm inserting breakpoints in the cpp file main.cpp which is a native that is generated automatically by the make ... in practice combines into a single file tall files arduino. In this way the breakpoints work properly and you can stop where you want the execution and control you vrbrain and variables etc..With the help of Emile and Roberto we are trying to remedy the problem.


Read more…

OctoQuadX VRBrain 5.2

Hello,

There is my latest home made craft:

OctoQuad X 750 mm frame, Center plates from 1mm carbon plate, arms are square carbon tube 22 mm ext, motor support are from 2.3 mm G4,

Take Off Weight is 4200 g,

T-Motor 4008-16 with 13" propellers, 6S,

Gimbal is replaced by one 1 kg lead box.

First flight went fine today,

Marc

12232300498?profile=original

Read more…

Happy New Year from Virtualrobotix's TEAM

12232300286?profile=original

Best wishes for a happy New Year from the team of Virtualrobotix

ALBANIAN Gëzuar vitin e ri
ALSATIAN e glëckliches nëies / güets nëies johr
ARABIC aam saiid / sana saiida
ARMENIAN shnorhavor nor tari
AZERI yeni iliniz mubarek
AFRIKAANS gelukkige nuwejaar

ITALIAN buon anno, felice anno
BAMBARA bonne année
BASQUE urte berri on
BELARUSIAN З новым годам (Z novym hodam)
BENGALI subho nababarsho
BERBER asgwas amegas
BETI mbembe mbu
BOBO bonne année
BOSNIAN sretna nova godina
BRETON bloavez mad
BULGARIAN честита нова година (chestita nova godina)
BIRMAN hnit thit ku mingalar pa
CANTONESE kung hé fat tsoi
CATALAN feliç any nou
CHINESE xin nièn kuai le / xin nièn hao
CORSICAN pace e salute
CROAT sretna nova godina
CZECH šťastný nový rok
DANISH godt nytår
DUTCH gelukkig Nieuwjaar
ESPERANTO felicxan novan jaron
feliæan novan jaron (Times SudEuro font)
ESTONIAN head uut aastat
FAROESE gott nýggjár
FINNISH onnellista uutta vuotta
FLEMISH gelukkig Nieuwjaar
FRENCH bonne année
FRIULAN bon an
GALICIAN feliz aninovo
GEORGIAN gilotsavt aral tsels
GERMAN ein gutes neues Jahr / prost Neujahr
GREEK kali chronia / kali xronia
eutichismenos o kainourgios chronos 
(we wish you a happy new year)
GUARANÍ rogüerohory año nuévo-re
HAITIAN CREOLE bònn ané
HAWAIIAN hauoli makahiki hou
HEBREW shana tova
HINDI nav varsh ki subhkamna
KANNADA hosa varshada shubhaashayagalu
KHMER sur sdei chhnam thmei
KIRUNDI umwaka mwiza
KOREAN seh heh bok mani bat uh seyo
KURDE sala we ya nû pîroz be
HUNGARIAN boldog új évet
ICELANDIC farsælt komandi ár
INDONESIAN selamat tahun baru
IRISH GAELIC ath bhliain faoi mhaise
JAPANESE akemashite omedetô
KABYLIAN asseguèsse-ameguèsse
NORWEGIAN godt nytt år
MACEDONIAN srekna nova godina
MALAGASY arahaba tratry ny taona
MALAY selamat tahun baru
MALTESE sena gdida mimlija risq
MAORI kia hari te tau hou
MONGOLIAN shine jiliin bayariin mend hurgeye 
(Шинэ жилийн баярын мэнд хvргэе)
MORÉ wênd na kô-d yuum-songo
LAO sabai di pi mai
LATIN felix sit annus novus
LATVIAN laimīgo Jauno gadu
LINGALA bonana / mbula ya sika elamu na tonbeli yo
LITHUANIAN laimingų Naujųjų Metų
LOW SAXON gelükkig nyjaar
LUXEMBOURGEOIS e gudd neit Joër
OCCITAN bon annada
PERSIAN sâle no mobârak
POLISH szczęśliwego nowego roku
PORTUGUESE feliz ano novo
ROMANI bangi vasilica baxt
ROMANIAN un an nou fericit / la mulţi ani
RUSSIAN С Новым Годом (S novim godom)
SAMOAN ia manuia le tausaga fou
SANGO nzoni fini ngou
SOBOTA dobir leto
SPANISH feliz año nuevo
SWAHILI mwaka mzuri
SWEDISH gott nytt år
SWISS-GERMAN äs guets Nöis
SARDINIAN bonu annu nou
SCOTTISH GAELIC bliadhna mhath ur
SERBIAN srecna nova godina
SHONA goredzwa rakanaka
SINDHI nain saal joon wadhayoon
SLOVAK stastlivy novy rok
SLOVENIAN srečno novo leto
TAMIL iniya puthandu nalVazhthukkal
TATAR yana yel belen
TELUGU nuthana samvathsara subhakankshalu
TAGALOG manigong bagong taon
TAHITIAN ia ora te matahiti api
THAI (sawatdii pimaï)
TIBETAN tashi délek
TURKISH yeni yiliniz kutlu olsun
UDMURT Vyľ Aren
UKRAINIAN Z novym rokom
URDU naya saal mubarik
WALOON (“betchfessîs” spelling) bone annéye / bone annéye èt bone santéye
WELSH blwyddyn newydd dda
WEST INDIAN CREOLE bon lanné
YIDDISH a gut yohr
VIETNAMESE Chúc Mừng Nam Mới / Cung Chúc Tân Niên / Cung Chúc Tân Xuân

Read more…


Dear Friends, 

a new member of our VR Gimbal Test Team, start to test a VR Copter Fly Cam configuration. This is his hexacopter, used for shooting this video :


70897389?profile=RESIZE_1024x1024


The Hexa configuration uses :

  • VR Brain 4.0 as Flight Control
  • Pulso Motor
  • 40A  ESC
  • 12" Graupner Propeller.
  • Prototype Version of 2 Axis Direct Driver gimbal , for VR Gimbal 3 axis testing and developing.


70897487?profile=RESIZE_1024x1024

To reach the best flight performance from VRBrain, out tester used this kind of trick for solve the issue vibration.
This is the result of vibration during the flight. It's very good :)


70897652?profile=RESIZE_1024x1024


70897707?profile=original


Our tester use acro mode during his first fly test and he's very happy of result have with VR Brain Flight control. 

http://www.virtualrobotix.com/page/vr-brain-v4-0


for more info about the status of the project join here :

http://www.virtualrobotix.com/group/vr-gimbal-user-group?xg_source=activity


Read more…

70917562?profile=original

Dear Friends,

I'm very happy to present the result of latest VirtualRobotix's development: the new VRX GPS NEO-M8 .

I'ts the first Virtualrobotix's Multi Constellation GPS (GPS, GLONASS, Galileo, QZSS and SBAS),  engine, using Ublox NEO-M8 receiver.

The NEO-M8 is a 72-channel high sensitive engine that boasts a Time-To-First-Fix (TTFF) of less than 1 second.

The dedicated acquisition engine, with over 2 million correlators, is capable of massive parallel time/frequency space searches, enabling it to find satellites instantly.

Innovative design and technology suppresses interference sources and mitigates multipath effects, giving NEO-M8 GPS receivers excellent navigation performance even in the most challenging environments.

VRX GPS NEO-M8 is  equipped with a Panasonic Amplifier for better reception and a backup battery for quicker warm restarts.

70917592?profile=RESIZE_1024x1024

The VRX GPS NEO-M8 also integrates Honywell's latest high precision digital mag (HMC5983). 

The HMC5983 can be used either in SPI or in I2C (selectable via a solder Jumper), it has a 200Hz output rate and it's temperature compensated, giving the best experience for our vehicles. 

The VRX GPS NEO-M8 is fully compatible with APM:Copter's  firmware and it's plug and play on VRBRAIN5, VRuBRAIN5, APM 2.5+, PixHawk and all boards that mount the DF13 connectors.

If you don't have a DF13, you can easly solder standard servo pins on the exposed pads.

The preorder is available at:

VRX GPS NEO-M8: http://www.virtualrobotix.it/index.php/en/shop/accessories/gps-ublox-8-detail

VR uBrain 5:  http://www.virtualrobotix.it/index.php/en/shop/autopilot/vrbrainmicro51-detail

If you are interested in the product click on notify me on the website to reserve the product.

Reservation is not binding.

The VRX GPS NEO-M8 has been tested in the field with our VRX300 "Personal Fly Robot SDK Platform"  here are some photos and  graphs from latest flights.

70917763?profile=RESIZE_1024x1024

Flight Controller: VR Micro BRAIN

GPS: VRX GPS NEO-M8

Compass: HMC5983 mounted on GPS board

ESC: 12 A Kiss ESC

Motors: RCX - ZMR 

Propellers: APC 6x4

Lipo: 2200 mAh

Radio: Taranis with SBUS receiver X8R

These are the vibration graphs on the VRX300 

70917676?profile=RESIZE_1024x1024

The number of satellites during this flight started at 11 and arrived to 15, the hdop was  from 1.3 to 1.5.

During my tests we have seen up to 18 satellites with an hdop of 0.7 .

With standard GPS module some times it is possible to see only 5 with an high HDOP

70917679?profile=RESIZE_1024x1024

Here is possible to see the Altitude from Baro vs Altitude from GPS is not so bad :) 

70917727?profile=original

Some RTL and Loiter tests in the Field with precision of less than 1 meter.

70917688?profile=RESIZE_1024x1024

70917738?profile=RESIZE_1024x1024

Features and Specifications:

  • ublox NEO-8 module
  • Concurrent reception of GPS/QZSS, GLONASS, BeiDou
  • Industry leading –167 dBm navigation sensitivity
  • 3,3V or 5V Inputs, with low noise 3.3V regulator.
  • 5 Hz update rate
  • Rechargeable 3V lithium backup battery for high efficient warm start
  • Panasonic Low Noise Amplifier for antenna signal with high gain (19dB)
  • EPCOS SAW high quality low-loss RF filter for GPS application
  • 25 x 25 x 4 mm ceramic patch antenna
  • Dedicated I2C EEPROM for receiver configuration storage
  • High resolution compass (2 milli-gauss) and high speed (2 milli-gauss)
  • Power and fix indicator LEDs
  • ArduPilot Mega compatible 6-pin JST connector
  • Exposed pads for simple soldering connection
  • 38 x 38 x 8.5 mm total size, 19 grams.
  • Receiver type NEO 8
    • 72-channel u-blox M8 engine
    • GPS/QZSS L1 C/A, GLONASS L10F
    • BeiDou B1
    • SBAS L1 C/A: WAAS, EGNOS, MSAS
  • Navigation update rate: 
    • Single GNSS up to 18 Hz
    • Concurrent GNSS up to 10 Hz
    • Position accuracy: 2.0 m CEP
  • Acquisition (NEO-M8Q/N)
    • (Default mode, GPS/SBAS/QZSS+GLONASS with TCXO)
    • Cold starts: 26 s
    • Aided starts: 2 s
    • Reacquisition: 1.5 s
  • Sensitivity 
  • (Default mode, GPS/SBAS/QZSS+GLONASS with TCXO)
    • Tracking & Nav: –167 dBm
    • Cold starts: –148 dBm
    • Hot starts: –156 dBm
  • Connector : Serial Bus , I2C Bus and SPI as option plug and play fully compatible with : VR Brain , APM 2.x , PX4 and Pixhawk Flight Control . Available also solder pad for OEM Application .

Best

Roberto 

Read more…

Blog Topics by Tags

Monthly Archives