All Posts (303)

Sort by

This video is doing by our VRGimbal user VR Gimbal with Sony 3D HXRNX3D1U ( 720 gr) in handeld mode

This is a video using complete VRGimbal with Panasonic GH2

..and this is another video of the same copter (in HD)

70900920?profile=RESIZE_1024x1024

70901012?profile=RESIZE_1024x102470900988?profile=RESIZE_1024x102470900951?profile=RESIZE_320x320

Dear Friends,

These are specification of our : VR Gimbal :

Micro Controller is STM32F1 at 72 mhz.

3 Axis Brushless Direct Drive gimbal :

  • Roll (MOT1)
  • Pitch (MOT2)
  • Yaw (MOT3)

For each channel we have 3 high power pwm 5 Amp output .

I2C IMU that support 3 axis . It is on camera module , so we can know exactly the position of camera and control in realtime the 3 Brushless motors. MPU6050 (6 DOF) + HMC5883 (3 DOF)

1 USB port.

1 Serial port that support mavlink protocol.

1 Power module that support until 3S battery.

4 Radio RC Input for :

  • Control ROLL Setup.
  • Control Pitch Setup.
  • Control YAW Setup.
  • IR control repeater.

4 Analog Input 0-3.3v

1 IR Out , so is pssible to control a remote camera by its ir receiver.

On new revision 2.0 we add :

  • customizable push buton.
  • support for motors ampere monitor for each motors.
  • Very intuitive Firmware update tools.
  • Simple and powerfull VR Gui for VR Gimbal configuration.
  • Serial driver on USB port.
  • A complete and updated wiki repository with media gallery with last video from our user.


In this video is possible see the utility available for measure the current used by different kind of motors. This feature is very usefull for evaluate the specification of motors.


Is available a new tools for firmware update you can found more detail here :

https://vrgimbal.wordpress.com/quick-start-guide/firmware-upgrade/

We release a Major release 1.0.9 we add a lot of new functionality and full support of pan stabilization with 1 IMU sensor or two sensor .

rev 1.0.9

  • Experimental Stabilize mode on Yaw (good with small pitch values)
  • Experimental Follow mode on Yaw (need motor steps calibration and PID reconfiguration)
  • Experimental support for second IMU for precise Yaw measurement (contact us for more info)
  • Added support for analog/digital input (like joysticks and buttons) to be used in alternative to RC:
    • configure channel 100 to 105 to use analog input 1 to 6;
    • use the “JYC” serial command and follow the instructions to calibrate the inputs.


rev 1.0.5

  • Completed PID mode on Roll and Pitch, with support of RC commands.
  • Manual (RC) mode (to be used on Yaw for now) working but requires improvement.
  • USB serial support (see vers. 1.04)

more info is available here :

http://vrgimbal.wordpress.com/download/vrgimbal-1-09/

The firmware is opensource the repo is available here :

http://code.google.com/p/vrgimbal/

So if you want to join in development you are welcome .


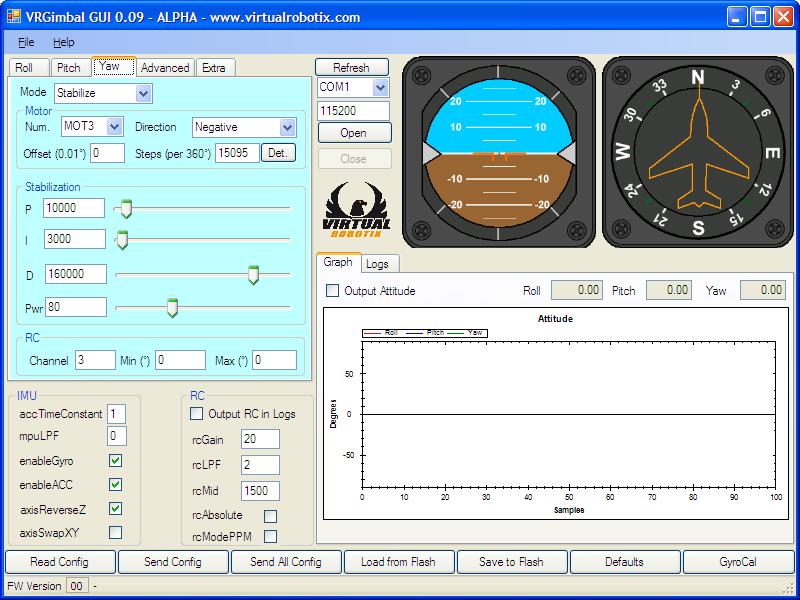
This is a screenshot of VR Gimbal Gui developed using .net technology, so could be work also using mono on mac and linux , test on that platform is welcome ,you can connect directly by usb to VR Gimbal or by radio link as 3dr module , blueetooth or other ttl wireles adapter :

We Upgrade also the VRGui with new functionality , slider full support of Pan axis and Full Frame.


vrgimbalgui_109.jpg?w=918&h=687

With VRGimbal is possible to control this kind of gimbal ;

Handheld and Air Drone Gimbal 2-3axis Entry level gopro gimbal.

Handheld and Air Drone Gimbal 2-3axis Heavy dslr gimbal.


This is an example of video doing by our user of VRGimbal on heavy dslr gimbal :

This is official thread in virtualrobotix community is here join us for have more info and support :

http://www.virtualrobotix.com/group/vr-gimbal-user-group?xg_source=activity

For info or order VR Gimbal 2.0 board send a mail to :

info@virtualrobotix.com

We can also support our user in custom development on oem - odm gimbal hardware or firmware contact us for more detail.


Read more…

In the video we present the development process of new technologies within the VR Lab.

70902616?profile=RESIZE_1024x1024

The first step is to evaluate different potential ideas at this stage and a lot of importance 'given to the design, Italy  known for great design studios and even within our group we have creative people who represent the future of italian design, the best choice is to be able to develop a mechanical level the product, check through the simulation that the drone is able to withstand the stresses to which it will be subjected during the flight and then verify the integration of the mechanical components with electronic ones.

70902661?profile=original


Once you've designed the drone virtually, we make the first prototypes with 3D printers and carry out flight tests and validation.

70902651?profile=RESIZE_1024x1024


A long and complex process but in the end a great satisfaction to see a materialized our dream.

70902716?profile=RESIZE_1024x1024

Ready for pre-order Fall 2013!!! ;-)

more info will be available in the next weeks

Best

Roberto Navoni

Read more…

The future is here after over two years of work can be said to have developed in the laboratories of Laser Navigation and thanks to the support of the network of laboratories Virtualrobotix drone technology of tomorrow.
A short video of a recent test test of our system of autonomous flight, mapping and advanced management of the payload.
In the video you can see to your left the management of telemetry and live images from the drone, during production of photogrammetry high definition of this shed, on the right instead you can see the anti collision system , mapping and location on board the drone, working in 3D mode, totally alternative to the GPS with an accuracy of 5 cm. Integrated into our flight control.
The system is able through modules VR SLAM and Payload managment to fully manage a mapping mission indoors and inspection giving results very impressive.
The localization module that we have implemented is fully compatible with automated features that normally are handled with GPS. So in fact allows both the flight assisted by Lidar that autonomous navigation with impressive precision than a standard GPS.
This new architecture named VR  Goliath it  is compatible with different types of frames is that copter trad hely, but also boat or plane depending on the component and makes' the supply to professional customers and advanced R & D. Soon we are planning at the Technical University of Padua, a faculty Aerospace Professional Seminar dedicated to students, researchers and High Tech companies  where they will present the results of these research activities and will experience first hand the latest innovations born out by our lab ... . different professional customers have begun to use these technologies and our feedback from the field in real situations have confirmed the quality tested in our laboratories. To access more information on the platform you can contact me at r.navoni@virtualrobotix.com .

Read more…

This video is the result of my last test :

In the test i'm using :

n my development i'm using :

Multipliot 32 :  http://www.virtualrobotix.com/page/multipilot32-1

VRIMU : http://www.virtualrobotix.com/page/vr-imu-10

VRI2C ESC: http://www.virtualrobotix.com/page/vr-bl-controller-10


The firmware is ArdupiratesNG 32 that i had implemented with some new libs and functionality :

The video is in italian but is simple to understand my test :

So i going in position manually , setup gps hold .

Take the quad and going far in other position ... then see the quad came back to original position.

After same test a leave the radio  far from me :)

What do you think of my result. My impression is that the code is very good .

I'm using i2c esc and i see the fly is smooth and correction ,too respect of standard esc.

Best

Roberto

Read more…

70864566?profile=RESIZE_320x320I'm delighted to announce the release of the first public beta of ArduPilot Mega 2.0. This is a significant upgrade to APM 1.02, and now delivers on full 2-way in-air communications, including real-time mission planning and autopilot control.


New features/changes include:

  • --Full support for the MAVlink protocol, which is now APM's default communications method.
  • --Auto-detection of GPS modules. No more requirement to tell APM what GPS module you're using--it will figure it out and configure the module appropriately!
  • 70864573?profile=RESIZE_320x320--2-way telemetry. Dozens of commands can now be sent from the Ground Station to the UAV while it's in the air. (see example from HK GCS at right)
  • --2-way Mission Planning. You can script and change missions in real time while the UAV is flying!
  • --Supports APM boards with the ATMega2560 chip, which has twice as much memory as the current board. The DIY Drones store will begin selling these new boards when the final version of APM 2.0 is released.
  • --Magnetometer fully supported.
  • --Current sensor fully supported
  • --Support for the latest HK Ground Control Station and QGroundControl ground stations.
  • --Mission Planning and configuration can now be done wirelessly. No need to use USB if you don't want to.
  • --No more fiddling with a configuration file in Arduino! The software comes ready to go, right out of the box
  • --New command-line tests allow you to check failsafe operation, Xbees, radio inputs and more.
  • --New versions of HK GCS and the Mission Planner operate in MAVLink mode, allowing for wireless operation and compatibility with other MAVLink devices, including those running the Robot Operating System (ROS)

---------------------------------------------------------------------------------------------

Huge props to the whole development team: Doug Weibel (project leader), Michael Smith, Jason Short, James Goppert, Michael Oborne (mission planner), Paul Mather (GCS), Lorenz Meier (MAVLink integration), Randy Mackay, Ryan Beall, Darren Corley, Joe Holdsworth, and countless others who have contributed with flight testing and bug catching!


As always, download the zip file, unzip it to your desktop. You will have two folders inside your APM 2.0 folder, as shown:


70864577?profile=original

Make sure you're using the latest Arduino (0022). Set your Arduino Sketchbook location to the APM 2.0 folder, as shown below. You must exit Arduino and restart it for this to take effect. Within Arduino, open up the ArduPilotMega.pde file within the ArduPilotMega folder, and that will open all the other files. Before you compile, don't forget to select the right board (Arduino Mega 1280 or Arduino Mega 2560)


70864658?profile=original70864624?profile=original

(Note: in the final version of APM 2.0, you will not have to use the Arduino IDE at all: the Mission Planner will load the firmware for you and check for more recent versions. The Arduino IDE will just be available in case you want to modify or inspect the code)


Remember that this is an initial beta release, so there may be bugs and undocumented bits. After the beta-testing period (usually about six weeks) we'll release APM 2.0 final version, and retire APM 1.02.


Additional instructions:

--If you're doing flight simulation with Xplane, instructions for doing it with APM 2.0 are here.

--Make sure you're using the latest Mission Planner and HK GCS. In the Mission Planner, make sure you select APM 2.x modes (MAVLink), shown at right.


Known issues:

1) Mission Planner won't write waypoints on Port 0 in HIL mode. Instead, write the waypoints via your Xbee (port 3); remember to change the Mission Planner baud rate to 57k when using the Xbee port.
2) Uploading mission commands is still not fully documented. We'll get to that this week
3) There may be some issues with datalogs not recording. We're looking into it.

4) The manual still describes the 1.02 software. We'll change that to 2.0 during the beta test period, so by the time we release the final of 2.0 the manual is fully updated.

5) This has been mostly tested with 900 Mhz Xbee modules and the XstreamBee adapter, which work great. However, there is an issue with the 2.4 Ghz Xbee modules, which have a slightly different hardware configuration that conflicts with that adapter when sending data upstream. A short term workaround is to solder a jumper from the adapter's CTS to V+ pin. The next version of these adapter boards will include a more graceful fix.


If you find any bugs, please file a report in the Issue Tracker. The dev team will not be responding to bug reports filed in blog comments

Read more…

VrBrain 4.5and External Led

Hello,

I received an APM Led Buzzer card (from Charles Lakins).APM 2x LED / Buzzer Module

Led and Buzzer have + on signal pin of the APM and - on the common - bar.12232303653?profile=original

After searching VrBrain 4.5 documentation and Barone Rosso Forum, I got the right wiring data in order to use that module.

I had to reverse polarity of the module by unsoldering and reversing Leds and Buzzer on the card. Then I changed the wiring on the plugs.

12232302898?profile=original

LED_Setting in the APM param list is 11

Here is it on board

12232303681?profile=original

Thanks,

Marc

Read more…

In this video is possible to see, the first long range test of  one of advanced functionality that  will be available in a new pro revision of VR Pad station , with this feature is possible recive in realtime a streaming in h.264 with latency near 300  ms. The new feature support : Wifi - 3G - 4G LTE . With Video streaming you recived in realtime the telemetry data from the drone. 

Another interesting video about a new advanced follow me functionality that will be available on VR Pad Station and VR Leash ,too 


70915245?profile=RESIZE_1024x1024

VR Pad Station is an app that turns your Android smartphone or your pad into a ground station combined with a powerful digital remote control radio for use with your RC model or with your drone. 
Is designed to be used on Rover, Airplane or Drones for hobby and professional use. It 's a project dynamic and evolving based on feedback from users of our community: www.virtualrobotix.com
It use mavlink 1.0 and support the firmware APM Copter , Plane and Rover

The current version is a preview suitable only for BETA testing use it carefully.
Use VR Radio only with the simulator, until new updates.

In Version 2.1.0 we adding the support for new VR Gimbal that use mavlink protocol for setting and control the camera . This is last video of new gimbal with mavlink support that use the mission planner mavlink but will be support of our new VR Pad Station  : 

Version 2.1.0

- Updated USB serial library (need more test)
- Added USB compatibility for VR Micro Brain
- Added VR Gimbal configuration panel
- Added a confirmation dialog when enabling RC override
- Improved communication handling
- Improved device compatibility with less requirements
- Fixed some crash problems
- Fixed other bugs

Version 2.0.9
- Added MavLink telemetry logs option
- Fixed FollowMe and Guided Mode
- Fixed "out of memory" problems on some devices
- Fixed a problem where gimbal parameters are not downloaded automatically inside settings
- Fixed crashes on loading airports
- Fixed a bug during arming

Version 2.0.8
- Fixed HDOP decimals
- Added confirmation dialog for ARM/DISARM/TAKEOFF
- Sticks are aligned to the RC of the drone before override
- Separated acc calibration from mag calibration panel
- Added button in mag calibration for compare the drone yaw with the device gps yaw
- Screen never in standby
- Added support to 19200 and 38400 serial baud rates
- Added solar radiation level info inside overview panel

Version 2.0.7
- Changed USB serial library, now it supports more devices

Version 2.0.6
- Added failsafe configuration settings

Version 2.0.5

- Added radio calibration in GCS settings;
- Added airports locations on map, in an area of 100km from user/drone position, activated from map settings;
- Fixed minor bugs;

Version 2.0.4

- Corrected gimbal settings layout on smartphones
- Added waypoint commands
- Long click on a waypoint in the list opens an editing dialog
- Option for setting the zoom when auto-pan is enabled
- Added option during the generation of polygon for set the altitude
- Added, where available, range/units/values of parameters
- 3D map in some areas with normal map type
- Now you can interact with map in the VR Radio, if RC override is not enabled
- Fixed an error in VR Radio where the channels goes directly from RC_MIN to RC_MAX
- Added failsafe and sensors status into HUD
- Added HDOP indication in the action bar

In the new revision 2.0.3 is available

  • A new info bar with a lot of usefull information battery level , gps status , active mode .
  • A new follow me standard mode .
  • Only one connection for different application.
  • Parameter setup for gimbal.
  • New configuration option pannel .
  • New advanced user interface compatible not only with PAD but also with Smartphone android device.
  • A early revision of VR Glass Station a special revision that work on Google Glass device.

We are work in progress with some advanced features as Special follow me mode , Fligh log book and VR Gimbal integration and advanced low latency h.264 video trasmission.

The App is compatible with APM Copter , Plane and Rover.

Inside the community could be possible discuss directly with developer about the new request feature .

Join us in beta testing this is the direct link to google store : 

https://play.google.com/store/apps/details?id=com.laser.VrPadStation

 Google Community Group for manage the beta testing of VR Pad Station continue to join new member  this is the link : 

http://plus.google.com/communities/102697330643558260161

This is the official Virtual Robotix Discussion group about VR PAD Station 2.0.3 :

http://www.virtualrobotix.com/group/vr-pad-station-2-0

Feedback about our application are welcome ... :) In the next week we intend improve VR PAD Station with new feature under development.

Best

Roberto

Read more…

First Italian Virtual Robotix Hacking Day

This week end we doing first Virtual Robotix Hacking day . 

Our Pilot meet Emile and assist to a first course for use VRBrain 4.0 on their drone.

In the morning we introduce the basic functionality of VR Brain and Mission planner and in the afternon we going to field and doing some flight test.

The next meeting will be about the advanced functionality of VR Brain.

After two days of teaching and testing  all Drone are on air and we help our Pilot to found a lot o small configuration problem. During the day we test all functionality available in last revision of code available for VRBrain 4.0 Arducopter32 rev 2.91-RC2 all work fine. The code after some bug correction work very well and   could be affordable , we need doing some hours of test before to confirm first impression.

Thanks to all guys that support this events :)

Marco join us in our test with his great review of VRBRAIN during a storm mounted on a medium okto coaxial quad.

more info FB  page : http://www.facebook.com/pages/VirtualRobotix-wwwvirtualrobotixcom/149125448465971?ref=hl

Best

Roberto Navoni

Read more…

FOXTEAM PRESENT ARDUROV the sentinel of the deep

70859006?profile=RESIZE_320x320

Dear Friends,
FoxTeam after the development project Fox Hybrid , HG3.2 and support Arducopter with Hexafox project is' working on a new exciting project.
Ardurov, follo
wed some pictures of the first rendering of the ROV we're doing.

There 's a lot of work to do, if someone wants to join the development team of the project can' contact me at my skype address: virtualrobotix


70859067?profile=RESIZE_320x320


Read more…

Virtual Robotix IDE Pro Manual


They finally managed to produce a small manual to compile the source and program the board Multipilot32 F1 (V1 and V3and F4 with vrobotix-ide-pro (Eclipse based).


The manual describes how to configure the environmenthow to compile the sources and how to program the boardTo program the board I took into consideration the following tools:

  • Multipilot32F1 (V1 and V3): DFU and ST-LINK/V2
  • Multipilot32F4: DfuSe and ST-LINK/V2
In the future I also integrate in the manual configuration and procedures to debugdirectly on the board with OpenOCD or ST-LINK/V2

For more information and , I opened on forum a new discussion Virtual Robotix IDE Pro

Thanks
Read more…

Debug VRbrain con ARM-USB-OCD-H by Olimex

Cercherò di spiegare come sono riuscito a configurare il debugger Jtag.

I will try to explain how I managed to configure the JTAG debugger.


Youtube video : http://youtu.be/AAGP1Vnus58


Prerequisiti:

1)Sistema di sviluppo VrBrain (eclipse etc.) installato e funzionante

2)Il debugger Jtag OLIMEX ARM-USB-OCD-H

3)Cavo di collegamento debugger -> Vrbrain.


Prerequisites:1) System development VrBrain (eclipse etc.) Installed and running2) The JTAG debugger OLIMEX ARM-USB-OCD-H3) Connection cable for debugger -> Vrbrain.


Incominciamo dal cavo, il pin-out da seguire e il seguente :

Let's start from the cable, the pin-out to follow and the following:


VRBRAIN                                            DeBugger

3V3  (01) --------------------- (01) VREF
GND  (03) --------------------- (04) GND
GND  (05) --------------------- (06) GND
GND  (07) --------------------- (08) GND
GND  (09) --------------------- (10) GND
TMS  (02) --------------------- (07) TMS
TCK  (04) --------------------- (09) TCK
TDO  (06) --------------------- (13) TDO
TDI  (08) --------------------- (05) TDI
TRST (10) --------------------- (03) TRST 


Il secondo passaggio e configurare Eclipse per poter utilizzare il nostro debugger.

Per cui

1° HELP-->Install New Software installare dalla sorgente :  Zylin - http://opensource.zylin.com/zylincdt il plugin Zylin Embedded CDT

2° Installare il pacchetto Olimex ODS IDE scaricabile dal sito olimex

3° Scaricare la verione 0.7 del OpenOCD dal sito http://www.freddiechopin.info/pl/download/category/4-openocd?download=99%3Aopenocd-0.7.0  (Questo perche le Openocd fornite da Olimex non sono aggiornate a questa versione che supporta il processore della vrbrain.)

4° Sconpattare il file appena scaricato nella cartella C:\OlimexODS\openocd-0.6.1 (Se avete mantenuto i path standard) in questo modo sfrutteremo le nuove librerie e file di configurazione della cpu.

5° Aggiungere al Path di sistema "C:\OlimexODS\openocd-0.6.1\scripts\chip\st\stm32"


The second step and configure Eclipse to use our debugger.whereby HELP -> Install New Software install from source: Zylin - http://opensource.zylin.com/zylincdt the plugin Zylin Embedded CDT Install the package Olimex ODS IDE downloaded from the website olimex3° Download the 0.7 version of OpenOCD from the site http://www.freddiechopin.info/pl/download/category/4-openocd?download=99 3Aopenocd-0.7.0

(This is because the OpenOCD provided by Olimex are not updated to this version that supports the processor vrbrain.) Unzip the file you just downloaded into the folder C:\OlimexODS\openocd-0.6.1 (If you kept the standard path) in this way we will use the new libraries and configuration files of the cpu. Add to System Path "C:\OlimexODS\openocd-0.6.1\scripts\chip\st\stm32"


Adesso Iniziamo a configurare il Debugger di Eclipse :


1° -->External Tool Configuretor

2° New Launch Configurator ... vi allego le immagini delle varie schermate e copiatevi i parametri.


Now begin to configure the Eclipse Debugger:  --> External Tool Configuretor New Launch Configurator ... I am attaching pictures of the various screens and copy the parameters.

12232299456?profile=original


12232299289?profile=original


3° Inpostiamo il Debug Configurator ... vi allego le immagini ... copiate i parametri.

 Set the Debug Build ... I am attaching pictures ... copied parameters.


12232299856?profile=original


Initialize:

target remote localhost:3333
monitor reset halt
monitor wait_halt
monitor sleep 100
monitor poll
monitor flash protect 0 0 11 off
load build/laserlab_MP32V1F4.elf
monitor sleep 200


Run:

symbol-file  build/laserlab_MP32V1F4.elf
monitor soft_reset_halt
monitor wait_halt
monitor poll
set breakpoint auto-hw on
info breakpoint
continue


12232300658?profile=original12232300854?profile=original12232300886?profile=original4° Ora create nella directory C:\vr-universal-ide\workspaces\UF4_AP\ACopter32_2.7_Beta1_VRBRAIN un file project.cfg con il notepad il testo seguente

Now create the directory C:\vr-universal-ide\workspaces\UF4_AP\ACopter32_2.7_Beta1_VRBRAIN project.cfg a file with notepad the following


# Find the board config file in the scripts/board/  directory

gdb_memory_map enable
gdb_flash_program enable

source [find scripts/board/olimex_stm32_e407.cfg]


(per inciso questo file di conf richiama soltanto il scripts/target/stm32f4x.cfg che e quello che ci serve ... )

5° ora editiamo il file C:\OlimexODS\openocd-0.6.1\scripts\target\stm32f4x.cfg  perchè i nostri amici di Openocd si sono dimenticati due volete un '3' ... quindi vi allego il testo del file da sostituire all originale


(this conf file only addresses the scripts/target/stm32f4x.cfg and that what we need ...) now edit the file C:\OlimexODS\openocd-0.6.1\scripts\target\stm32f4x.cfg because our friends OpenOCD they forgot two want a '3 '... then I am attaching the text of the file to be replaced to original


# script for stm32f4x family

if { [info exists CHIPNAME] } {

set _CHIPNAME $CHIPNAME

} else {

set _CHIPNAME stm32f4x

}

if { [info exists ENDIAN] } {

set _ENDIAN $ENDIAN

} else {

set _ENDIAN little

}

# Work-area is a space in RAM used for flash programming

# By default use 64kB

if { [info exists WORKAREASIZE] } {

set _WORKAREASIZE $WORKAREASIZE

} else {

set _WORKAREASIZE 0x10000

}

# JTAG speed should be <= F_CPU/6. F_CPU after reset is 8MHz, so use F_JTAG = 1MHz

#

# Since we may be running of an RC oscilator, we crank down the speed a

# bit more to be on the safe side. Perhaps superstition, but if are

# running off a crystal, we can run closer to the limit. Note

# that there can be a pretty wide band where things are more or less stable.

adapter_khz 1000

adapter_nsrst_delay 100

jtag_ntrst_delay 100

#jtag scan chain

if { [info exists CPUTAPID] } {

set _CPUTAPID $CPUTAPID

} else {

# See STM Document RM0090

# Section 32.6.2 - corresponds to Cortex-M4 r0p1

set _CPUTAPID 0x4ba00477

}

jtag newtap $_CHIPNAME cpu -irlen 4 -ircapture 0x1 -irmask 0xf -expected-id $_CPUTAPID

if { [info exists BSTAPID] } {

set _BSTAPID $BSTAPID

} else {

# See STM Document RM0090

# Section 32.6.3

set _BSTAPID 0x06413041

}

jtag newtap $_CHIPNAME bs -irlen 5 -expected-id $_BSTAPID

set _TARGETNAME $_CHIPNAME.cpu

target create $_TARGETNAME cortex_m3 -endian $_ENDIAN -chain-position $_TARGETNAME

$_TARGETNAME configure -work-area-phys 0x20000000 -work-area-size $_WORKAREASIZE -work-area-backup 0

set _FLASHNAME $_CHIPNAME.flash

flash bank $_FLASHNAME stm32f2x 0 0 0 0 $_TARGETNAME

# if srst is not fitted use SYSRESETREQ to

# perform a soft reset

cortex_m3 reset_config sysresetreq


OK FINITO!

OK FINISHED!


Ora per fare il debug lanciate dal menu di eclipse "external Tool" la configurazione creata prima con il nome ARM-USB-OCD-H, ricordatevi che il debugger deve essere collegato alla vr-brain sul connettore jtag, la vrbrain deve essere alimentata ... e il ponticello per entrare nella modalità "download firmware" non deve essere rimosso.


Fatto questo lanciate da Eclipse il debugger STM32 che abbiamo creato prima e voilà ... compilazione del codice, creazione del file, download del firmware su vrbrain, reset tutto in automatico .... e ... buon debug a tutti.


P.s I breakpoint non si possono mettere nei file arduino .pde ... per ora io sto inserendo i breakpoint nella main.cpp che e un file cpp nativo e che viene generato in automatico dal make ... in pratica unisce in un unico file tutt i file arduino. Messi li i breakpoint funzionano correttamente e potete interrompere dove volete l'esecuzione della vrbrain e controllarvi le variabili etc.

Con l'ausilio di Roberto e Emile stiamo cercando di ovviare al problema.


Now to debug launch menu eclipse "external tool" created before the configuration with the name ARM-USB-OCD-H, remember that the debugger must be connected to the JTAG connector on the vr-brain, the vrbrain must be supplied. .. and the bridge to enter the mode "download firmware" should not be removed.Once this is done run the debugger from Eclipse STM32 we created earlier and voila ... compiling your code, create the file, download the firmware on vrbrain, reset all automatically .... and ... good debugging at all.Ps. you can not put breakpoints in files arduino. Pde ... for now I'm inserting breakpoints in the cpp file main.cpp which is a native that is generated automatically by the make ... in practice combines into a single file tall files arduino. In this way the breakpoints work properly and you can stop where you want the execution and control you vrbrain and variables etc..With the help of Emile and Roberto we are trying to remedy the problem.


Read more…

Quadcopter . . . On The Moon!

1110-77-Dx582.jpg


Known as the Terrestrial Artificial Lunar and Reduced Gravity Simulator, or Talaris, the three-foot-wide vehicle is a smaller version of a hopper that would be used in space. It is designed to go about 20 meters per hop; space-based hoppers might cover tens of kilometers--or possibly more--in a single bound. The team that built Talaris wants to use it on Earth to test guidance, navigation, and control software developed by Draper that would allow the space-based hopper to navigate autonomously.


The prototype was developed as part of MIT's effort to win the Google Lunar X Prize, a $30 million competition to get a privately funded spacecraft to reach the moon, travel 500 meters across its surface, and transmit video, images, and other data back to Earth. Both MIT and Draper are members of Next Giant Leap, one of about 20 teams registered in the competition.


Original post : http://www.diydrones.com/profiles/blogs/quadcopter-on-the-moon


Leaps and Bounds - Technology Review


Read more…

VirtualRobotix announcing new products and website

70906711?profile=RESIZE_1024x1024


It is with great pleasure that we are able to present the result of our latest work.

In the last 4 months we designed, built and tested 2 frames and 2 Gimbals.

This is just a preview of these new products, production will start in the next month and pre-orders are available through our freshly re-designed web site www.virtualrobotix.it


Black Ops Drone aka B.O.D.

A multipurpose drone specifically designed for gaming and simulated wars. It is a plastic 2 shell frame very resistant and light weight. It is splashproof and can mount a small FPV camera on front. It can be used with many different payloads and mounts 3508 motors with 13" propellers.

VR_BOD1.jpg?width=700


VR TIGER SHARK

A powerful, tough and yet simple frame built with only 3k twill carbon fiber and High grade Aluminum.

The frame is designed so that X4 or X8 configuration is possible without any other add-on.

It is extremely tough and resistant, and host propellers up to 14" or 15" .

Typical configuration is with 3510 or 3508 Motors with 13" props, but also 40mm. motors can be mounted with no problems. The arms can be shifted in 1,5cm. steps to allow bigger props (15").

70906637?profile=RESIZE_1024x1024


VR SHOCKWAVE GIMBAL

A professional 3 axis Brushless Gimbal built with 3k twill carbon fiber that is able to carry 3Kg. of payload.

This is our masterpiece. It uses high quality Stainless steel bearings and it is integrated with adjustable height landing gear.

It weights about 600gr. and it offers super smooth camera compensation.

70906700?profile=RESIZE_1024x1024


VR SHOCKWAVE HANDY

The same Shockwave Gimbal can be used on our hand-held system allowing camera operators and professional photographers to obtain perfect stable images. The hand held mount can be equipped with remote control for PAN, TILT, ROLL and ZOOM.

70906757?profile=RESIZE_1024x1024


VR EASYSHOT GIMBAL

A 2 or 3 axis Gimbal designed to fit the most common and light to medium cameras such as:

Sony NEX xx

Canon M series

Sony Cybershot VX420 or similar

Totally built wi Alu and Carbon fiber it is extremely light and it is sold with an antivibration plate suitable for any frame. It's weight without mootrs is 280gr. and is perfectly able to carry 300-400gr. of payload.

70906852?profile=RESIZE_1024x1024


Please refer to www.virtualrobotix.it for more details and don't hesitate to askany questions.

The VirtualRobotix team


Read more…

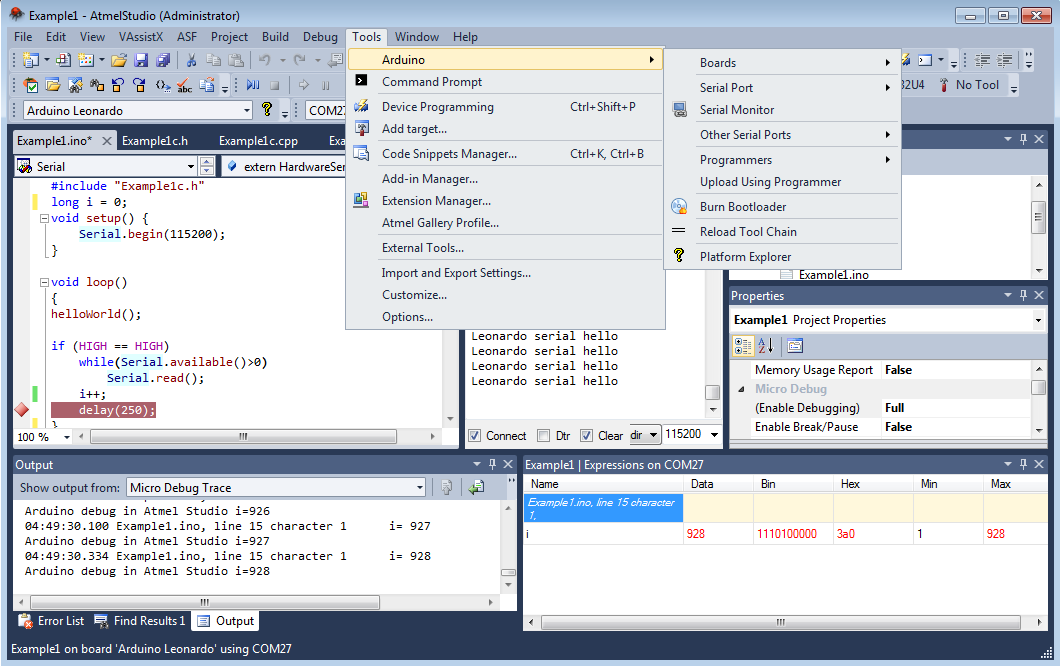
Arduino and CygWin IDE for Atmel Studio

atmel-studio-arduino-leonardo-debug.png

Visual Micro has released an update to their IDE for Atmel Studio and Visual Studio that supports APM SITL, HAL and Arduino. The plugin is a simple 10 minute install with no complex setup instructions.

In addition to simple setup for all users, the plugin also extends the Arduino build process in many different ways providing more flexibility for experienced developers.

Read more about the Arduino plugin for Visual Studio and Atmel Studio


An optional usb debugger is also available

Read more…

70891919?profile=RESIZE_480x480


In the last months on the market appear a lot of low cost micro quad , they are very nice toys i like a lot play with it . But the main problem is that the standard electronic is not hackable and i cannot use my radio for control the quad. So i decide to evaluate if was possible interface a quad toy frame with my VRBRAIN.

  • The main tets that i doing was the payload and discover that was possible to going in air with a payload of 100 gr. VRBrain in Naked configuration is only 21 gr
  • The other problem was how i can manage the motors ? So i doing a bit of retro eng and discover the electronic need to my vrbrain for control the dc motors.
  • After solve the electronic problem i start to check the patch to firmware and found how can change the pwm parameter for control the dc motors.
  • Other problem was the battery , normally the quad toys use a 1s battery but the standard input voltage is 5volt. So i check the schematics of vrbrain and found a 3volt input , put on the 1s battery a small 3.3volt stabilizer and put the output on the gps output 3.3v .
  • After last patch i thought that i'm ready for first fly , but last things  was the radio ... fortunately my Jeti receiver work also at 3.3volt  so it work , i have only a signal on my radio about low level voltage ... :(

70892180?profile=RESIZE_480x480

The final result was this : I'm happy to present VR Pico Drones , basically it use standard arducopter32 2.9 on my VRBRAIN and support all standard functionality available in arducopter , stable , acro , loiter , rtl and auto navigation . So this is smallest Arducopter drone available on the planet :) This is only first prototype the wheight is 110 gr. My idea is to doing some optimization on board and have a 85 gr drone capable of 10 minutes of funny fly.

70892187?profile=RESIZE_480x480

After some days of hard work this is my first fly test . I'm very happy of this first results :) The main target of this development is to use VRBRAIN for learning to fly during winter days in indoor. I play a lot with simulator but fly with a real copter is better.

Read more…

This is first halt hold (acc z compensation)  + loiter of VRBRAIN using TauLab Firmware (Open Pilot Fork)

Dear Friends,

after some months of work Stefan send me last update about his work on Taulabs Project.

this is his Repo on Github : 

https://github.com/scenkov/vrbrain


Taulab is a fork of Original Open Pilot project , some guys decide to fork it and develop a code that support a lot of different platform .

The main advantages of this project is that native at 32 bit , use a operating system and all the code is write in pure c , not use c++ class. 

A lot more complex of other project but very interesting for developers.

The other advantages of work doing by Stefan is the opportunity to doing some benchmark between two firmware that use same hardware VR Brain . 

Could be interesting evaluate the quality and performance of firmware ported to 32 bit platform as Arducopter32 rev 2.9.1.1 and TauLab that instead use an Operating system and is 32 bit native. 

This is only a introduction of work doing by Stefan he promise me that create a post with more info about his works :)


So this is some example of how vrbrain fly with TauLab Project firmware 

Stable fly :

Simple Fly :


The next step will be : return to home , auto landing and navigation waypoint :)


Original blog post : http://www.virtualrobotix.com/profiles/blogs/vrbrain-and-last-update-on-taulab-project-by-stefan-first-loiter


Read more…

Let's rock !

Let's rock !
It's time to start my first Quad build.

But before... i would like to really thanks Roberto for his helpfulness and his amazing work. Thanks my friend.

I'm a newbie in RC world, so my first step was to buy motors, ESC, batteries, charger and so on..
I'm waiting for that stuff orderer online, so at the moment my job is working on code to try to understand how it works.

My first project is based on Aeroquad firmware with Wii IMU and Arduino Mega (i already have that in my garage, so no reason to buy new stuff for the moment).

I modified last SVN release of Aeroquad 2.0 (R413) because it was not possible to build it with WiiIMU configuration.

I'm using Eclipse IDE to work on Arduino code.. few lines of code changed in main Aeroquad.pde file and i can use a real IDE to build code and upload it to Mega. Lol :)

I added this at the beginning :

// IDE Configuration
#define ECLIPSE_BUILD

and this before setup() :

#ifdef ECLIPSE_BUILD
// List of addition files
#include "FlightCommand.pde"
#include "FlightControl.pde"
#include "Sensors.pde"
#include "SerialCom.pde"

// This code is required if the project is being built under Eclipse
extern "C" void __cxa_pure_virtual() {
cli();
for (;;);
};

int main(void) {
/* Must call init for arduino to work properly */
init();
setup();
for (;;) {
loop();
} // end for
} // end main
#endif

It's very simple to switch between Arduino IDE and Eclipse IDE.. simply changing one #define.

A proposal to Roberto (probably to be forwarded to Aeroquad / Arducopter team guys) : why don't officially support Eclipse IDE in their projects ?

Congratulations to FoxTeam members for their amazing jobs.

Vittorio


Read more…

Latest Firmware test - 0.0.5.5.2

Today I had my second test flight with the latest Firmware.

The results are incredible. The quad was very stable and solid also on very hard manouvres.The improvements are beyond my expectations.
You judge:

The Board tested was the VRIMUFULL with the MP32V3F1 and the BMP085 barometer.

Recent changes include:


- Updated default values for Stabilization
- Changed main loop timing.
- Fixed a memory bug.

This is the port of the Arducopter 2.6 firmware. Thanks to the original developers.

Still ALT_HOLD and GPS must be improved.
To choose your board in the config.h fie you have these options
(please comment with // what you don't need):

BOARD selection:
#define CONFIG_APM_HARDWARE MP32V1F1 //old board (rev. 1)
#define CONFIG_APM_HARDWARE MP32V3F1 //new board


GYRO and ACCELS selection:
#define INS_VRIMUFULL //standard sensors
#define INS_MPU6000 //new MPU6000 sensor


BAROMETER:
#define CONFIG_BARO AP_BARO_MS5611 //new barometer
#define CONFIG_BARO AP_BARO_BMP085 //old barometer


SENSOR BOARD:
#define CONFIG_MAG MP32NAVYSENSOR //standard board
#define CONFIG_MAG MP32NAVY2012 //new board with GPRS and dataflash
Once uploded please follow these steps:


1. In CLI mode SETUP --> erase and Reset.
2. Calibrate Radio
3. Calibrate compass by arming (without propellers!) and turning the copter on all axes.
4. Level and check that all variables are consistent.


The default parameters are based on my quad and my experience.

Please tune for your copter.
This firmware was tested with VRIMUFULL + MP32V3F1 + MPU6000 and VRIMUFULL + MP32V3F1 + STANDARD SENSORS

https://www.youtube.com/watch?v=SczauszAlbA

Read more…

Blog Topics by Tags

Monthly Archives